 Q2
Q2
 QIDI Box
 Plus 4
 Q1 Pro
 X-Max 3


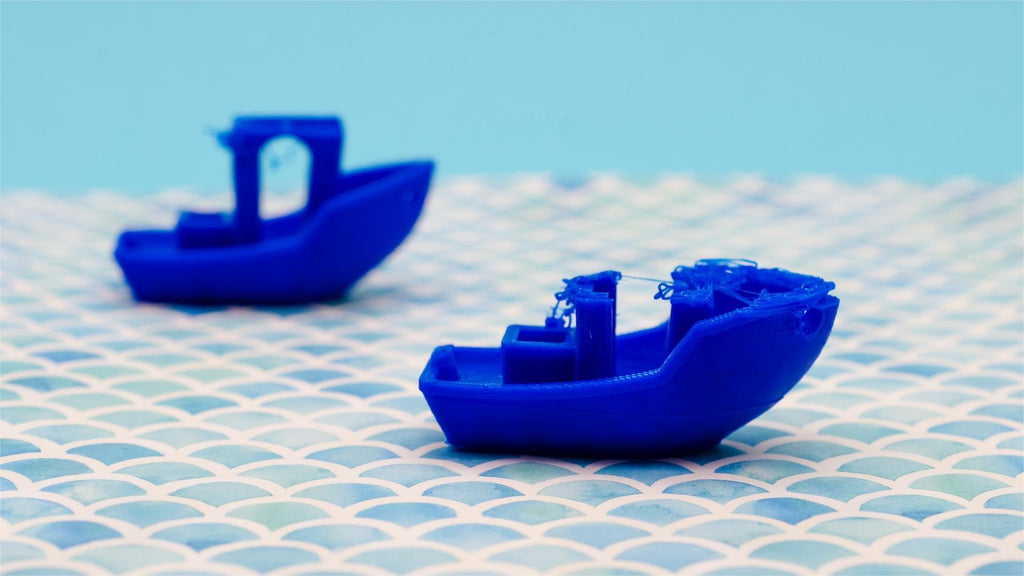
3D Printing Troubleshooting Guide: Common Problems, Causes, and Fixes


3D printing problems often come down to a few common causes: poor bed adhesion, incorrect temperature, wet filament, nozzle clogs, motion issues, or unsuitable slicer settings. This FDM/FFF 3D printing troubleshooting guide helps you identify common symptoms, understand why they happen, and fix them step by step. Whether your print is warping, stringing, shifting layers, or failing halfway through, start with the most likely cause and adjust one setting at a time.
Quick 3D Printing Troubleshooting Chart
| Problem You See | Common Causes | Check First |
| Print will not stick to the bed | Dirty build plate, incorrect Z-offset, low bed temperature, fast first layer | Clean the bed, adjust Z-offset, slow down first layer |
| Corners lift or curl | Warping, poor adhesion, fast cooling, material shrinkage | Add brim, control drafts, adjust bed/nozzle temperature |
| Thin strings between parts | High nozzle temperature, poor retraction, wet filament | Dry filament, run a temperature tower, tune retraction |
| Gaps in walls or layers | Under-extrusion, clog, low temperature, flow issue | Check nozzle, filament path, extruder gear, flow rate |
| Bulging or rough surfaces | Over-extrusion, high temperature, poor cooling | Reduce flow slightly, lower temperature, check cooling |
| Layers shift sideways | Loose belts, excessive speed, nozzle collision, skipped steps | Check belts, reduce speed/acceleration, inspect model warping |
| Print cracks between layers | Low nozzle temperature, too much cooling, cold environment | Raise temperature slightly, reduce fan, stabilize ambient temperature |
| Clicking extruder | Clog, low temperature, filament jam, too much back pressure | Pause print, check filament path and nozzle |
Before You Change Settings, Check the Basics
Many failed prints are caused by simple issues rather than complex printer defects. Before changing advanced slicer settings, check these basics:
- The build plate is clean and free from oil, dust, and leftover adhesive.
- The nozzle is clean and not dragging through the first layer.
- The filament is dry, smooth, and feeding without resistance.
- The bed is leveled, or the automatic bed mesh is working correctly.
- The Z-offset is close enough for good first-layer squish but not so close that the nozzle blocks extrusion.
- The slicer profile matches your nozzle size, filament type, and printer.
- The hotend fan and part cooling fan are working as expected.
Make only one change at a time. If you adjust temperature, flow, retraction, and speed all at once, you may fix one problem while creating another.
First-Layer Problems
The first layer decides whether the rest of the print has a chance to succeed. If the first layer is too loose, the print may detach. If it is too compressed, the nozzle can scrape the surface, block filament flow, or create ridges.
Print Not Sticking to the Bed
Poor bed adhesion is one of the most common 3D printing problems. It usually happens because the build surface is dirty, the nozzle is too far from the bed, the bed temperature is unsuitable, or the first layer is printing too fast.
Start with the simplest fix: clean the build plate. Finger oils can reduce adhesion even when the plate looks clean. Then check the Z-offset. A good first layer should look slightly flattened, with neighboring lines touching each other. If the filament looks round and loose, the nozzle is probably too high. If the layer looks transparent, rough, or scratched, the nozzle may be too low.
For difficult parts, slow down the first layer and increase the first-layer line width slightly in the slicer. A brim can also help by increasing the contact area between the print and the bed.
Messy First Layer
A messy first layer can look like waves, blobs, gaps, or rough lines. This often comes from an incorrect Z-offset, over-extrusion, residue on the bed, or a nozzle that is too close to the surface.
First, adjust the Z-offset in small steps. Do not solve adhesion by crushing the first layer too much. That may make the first layer stick, but it can also cause elephant foot, nozzle scraping, or under-extrusion in the next layers.
If the first layer still looks messy, check whether your flow rate is too high, your first-layer temperature is too hot, or the nozzle has old plastic stuck to the outside.
Warping, Curling, and Layer Separation
Warping happens when plastic cools and contracts unevenly. The bottom of the print may stay attached in some areas while corners or edges pull upward. This is more common with materials that shrink more during cooling, such as ABS, ASA, PC, and nylon, but it can also happen with PLA or PETG on large flat parts.
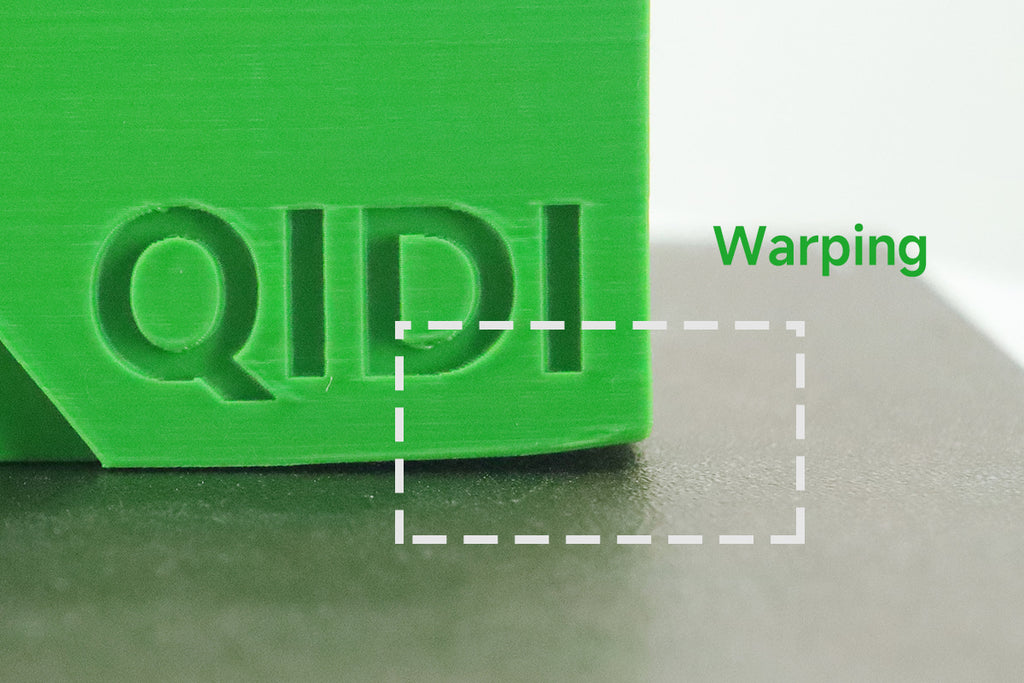
Corners Lifting From the Bed
If corners lift, improve bed adhesion and reduce thermal stress. Clean the build plate, check Z-offset, use the correct bed temperature, and add a brim for large or sharp-cornered parts.
Also check the environment. Cold drafts, air conditioning, and open windows can cool the print unevenly. For higher-shrink materials, a stable warm printing environment is often more important than simply increasing bed temperature.
Cooling should be material-specific. PLA usually benefits from strong part cooling after the first layers. PETG often needs moderate cooling. ABS, ASA, PC, and nylon usually need less fan and a more stable ambient temperature. Avoid using one cooling strategy for every material.
Cracks Between Layers
Layer separation or cracking usually means the layers are not bonding well. This can happen when the nozzle temperature is too low, the fan is too strong, the print environment is too cold, or the material shrinks significantly during cooling.
Try increasing nozzle temperature in small steps, reducing fan speed, and protecting the print from drafts. For tall or thin-walled prints, consider adding more walls, using a warmer enclosure when appropriate, or choosing a material with lower shrinkage.
Extrusion Problems
Extrusion problems affect the amount of plastic coming out of the nozzle. They can show up as missing lines, weak walls, rough surfaces, blobs, or inconsistent layers.
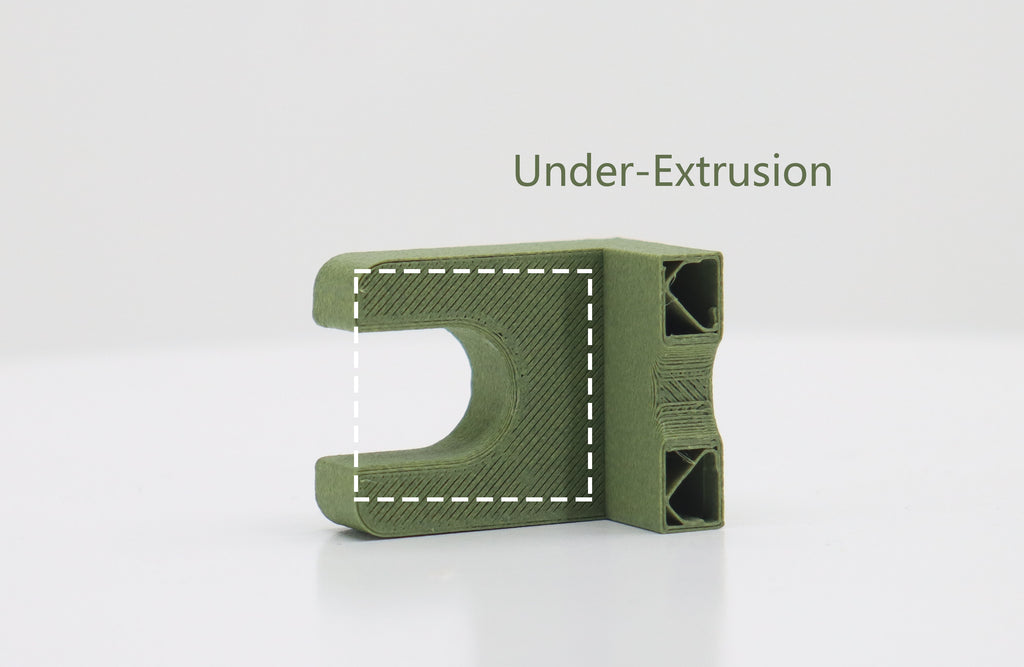
Under-Extrusion
Under-extrusion means the printer is not extruding enough filament. You may see gaps in walls, weak infill, missing top layers, thin lines, or parts that break easily.
Common causes include a partial nozzle clog, low printing temperature, tangled filament, worn extruder gears, incorrect flow settings, or printing faster than the hotend can melt material.
Start by checking the filament path. Make sure the spool turns freely and the filament is not tangled. Then inspect the extruder gear for ground filament dust. If the gear is chewing the filament, there may be too much resistance in the nozzle or filament path.
Next, check the nozzle. If filament curls sideways when extruded in mid-air, or if the flow is thin and inconsistent, the nozzle may be partially clogged. A cold pull or cleaning filament can help clear burnt material or debris from the hotend. If the nozzle is old, worn, or badly clogged, replacement may be the better option.
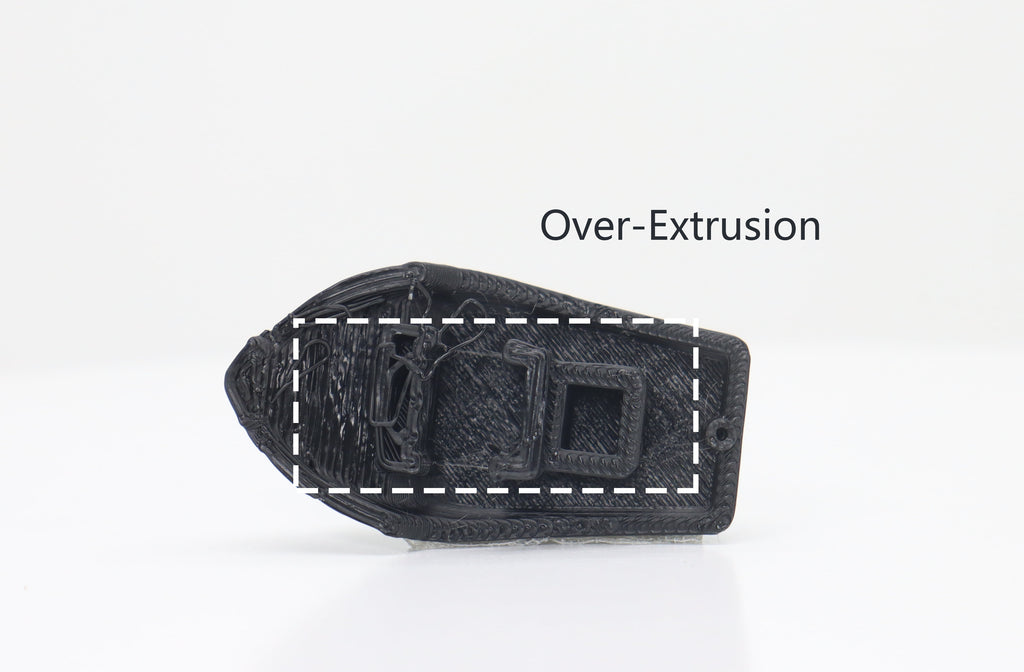
Over-Extrusion
Over-extrusion means too much filament is being pushed through the nozzle. Symptoms include rough surfaces, thick walls, blobs, excess material on corners, and poor dimensional accuracy.
First, confirm that the slicer is using the correct filament diameter and nozzle size. Then reduce flow rate in small steps rather than making large changes. Also check temperature: printing too hot can make plastic flow too easily and increase surface defects.
Do not confuse over-extrusion with a nozzle that is too close to the bed. If only the first layer looks overfilled, adjust Z-offset first. If the whole print looks swollen or rough, check flow and temperature.
Nozzle Clogs
A nozzle clog can be complete or partial. A complete clog stops extrusion. A partial clog may still extrude filament, but the line looks thin, uneven, or curled.
Common causes include dust, burnt filament, low-quality or contaminated filament, heat creep, printing too cool, or switching from a high-temperature material to a lower-temperature one without cleaning the nozzle.
To prevent clogs, store filament properly, keep the nozzle clean, avoid leaving filament cooking in a hot nozzle for too long, and use the correct temperature for the material. When changing materials, especially from high-temperature to low-temperature filament, purge thoroughly.
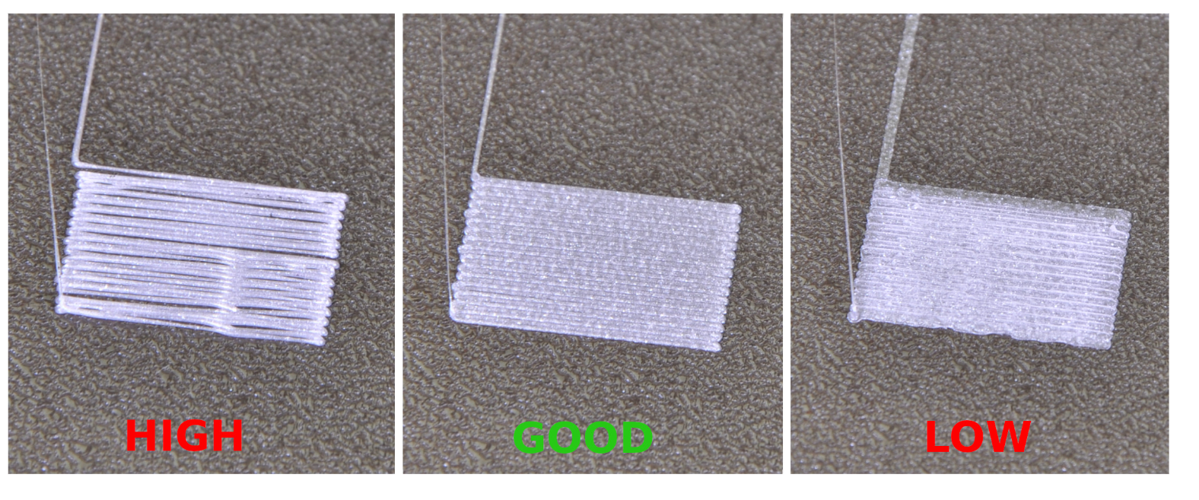
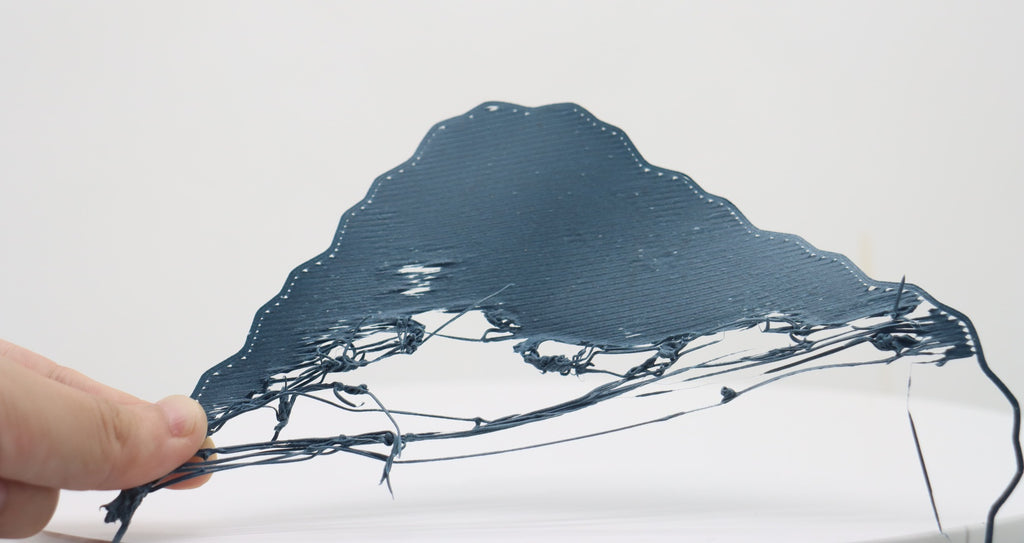
Stringing and Oozing
Stringing happens when thin strands of plastic are left between separate areas of a print. It is usually caused by molten filament leaking from the nozzle during travel moves.
The most common causes are nozzle temperature that is too high, retraction settings that are not tuned, wet filament, or travel moves that are too slow.
Start with filament condition. Wet filament can cause stringing, popping sounds, rough surfaces, and inconsistent extrusion. Dry the filament if needed, especially for hygroscopic materials such as PETG, TPU, nylon, and some composites.
Next, run a temperature tower. A lower temperature often reduces oozing, but do not lower it so much that layer adhesion becomes weak. Then tune retraction. Direct drive extruders usually need shorter retraction distances than Bowden systems. Adjust retraction gradually and test with a small retraction model.
Travel speed can also help. Faster travel moves give the nozzle less time to ooze between printed areas, but excessive speed may introduce ringing or motion problems.
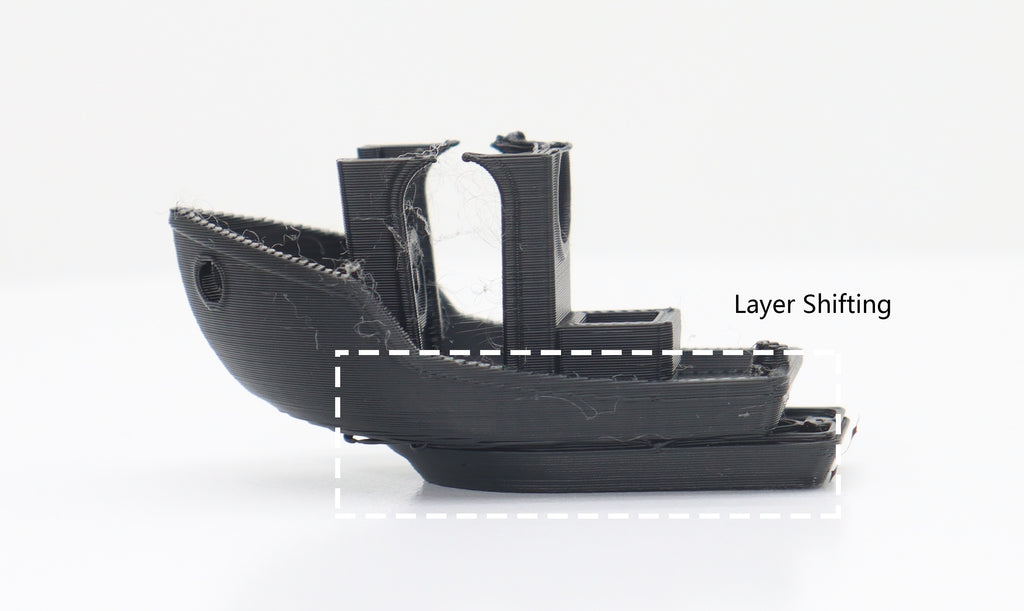
Layer Shifting and Motion Issues
Layer shifting happens when part of the print suddenly moves sideways, causing the upper layers to be offset from the lower layers. It is usually a mechanical or motion-related problem.
Check belts first. Loose belts can slip, while overly tight belts can create friction and wear. Also inspect pulleys and screws to make sure they are secure.
Next, reduce print speed and acceleration. Fast printers can produce excellent results, but aggressive settings may cause skipped steps, especially on heavy beds or large prints.
Also look for nozzle collisions. If the print warps upward, the nozzle may hit the raised area and shift the layer. In that case, the layer shift is a symptom; the real problem is warping or poor adhesion.
Surface Quality Problems
Surface defects can come from temperature, cooling, flow, vibration, or slicer settings.
Blobs and Zits
Blobs and zits are small bumps on the surface of a print. They often appear where the printer starts or stops an extrusion path. Causes include high temperature, excess flow, pressure buildup in the nozzle, poor retraction, or seam placement.
Try lowering temperature slightly, tuning retraction, and checking seam settings in the slicer. If your slicer supports pressure advance or linear advance, calibrating it can improve corners and reduce pressure-related defects.
Rough Top Layers
Rough top layers may come from over-extrusion, too few top layers, poor cooling, or infill showing through. Increase the number of top layers, reduce flow slightly, and make sure the cooling fan works properly for materials that need cooling.
If the top surface has gaps instead of rough excess material, the issue may be under-extrusion or too few top layers rather than over-extrusion.
Ringing or Ghosting
Ringing appears as repeated ripples near sharp corners or details. It is usually caused by vibration from fast movement, high acceleration, loose belts, or an unstable printer frame.
Reduce acceleration and jerk settings, place the printer on a stable surface, and check that belts and wheels are properly adjusted. For modern high-speed printers, input shaping calibration can reduce ringing when supported.
Filament Problems
Filament quality and storage have a major impact on print reliability. Even a well-calibrated printer can struggle with wet, brittle, dusty, or inconsistent filament.
Wet filament may cause popping sounds, bubbles, stringing, rough surfaces, weak parts, or inconsistent extrusion. Keep filament sealed when not in use, preferably with desiccant. Dry moisture-sensitive materials before important prints.
Filament diameter consistency also matters. A reliable filament should clearly state its diameter tolerance, but the exact number varies by manufacturer. What matters most is consistent extrusion and stable behavior across the spool.
If a print suddenly becomes inconsistent after switching to a new spool, do not assume the printer is broken. Test with a known-good filament before changing hardware.
Material-Specific Troubleshooting Tips
| Material | Common Issues | Useful Adjustments |
| PLA | Stringing, heat creep, poor overhangs, warping on large parts | Use good cooling, avoid overly hot enclosed printing, tune retraction |
| PETG | Stringing, nozzle buildup, first layer too sticky | Dry filament, use moderate cooling, avoid over-squishing first layer |
| ABS/ASA | Warping, cracking, layer separation | Use stable warm environment, reduce drafts, use less fan |
| TPU | Stringing, feeding issues, slow extrusion | Print slower, reduce resistance in filament path, dry filament |
| Nylon | Moisture, warping, weak finish when wet | Dry thoroughly, use stable temperature, store carefully |
| PC | Warping, high-temperature requirements | Use appropriate hotend/bed capability and controlled environment |
Common Troubleshooting Mistakes to Avoid
- Do not change too many settings at once. A clean troubleshooting process is slow but reliable.
- Do not use extreme nozzle temperatures to force extrusion. If the printer is under-extruding, the cause may be a clog, filament path resistance, or speed limit rather than low temperature.
- Do not crush the first layer to make every print stick. A nozzle that is too low can block extrusion and damage the build surface.
- Do not use the same cooling settings for every material. Cooling that improves PLA can weaken ABS or ASA prints.
- Do not ignore wet filament. Many stringing and surface quality issues are actually moisture problems, not slicer problems.
FAQs about 3D Printing Troubleshooting
Q1. Why does my 3D print fail halfway through?
Mid-print failures often come from poor bed adhesion, nozzle clogs, heat creep, tangled filament, layer shifts, or a model that warps upward and gets hit by the nozzle. Check the print surface, filament path, nozzle flow, and motion system before changing advanced slicer settings.
Q2. Should I adjust temperature or retraction first for stringing?
Check filament dryness first, then run a temperature test. If the material is dry and the temperature looks reasonable, tune retraction. Changing retraction before fixing wet filament can lead to confusing results.
Q3. How do I know if my nozzle is partially clogged?
A partially clogged nozzle may still extrude, but the filament line may look thin, curled, uneven, or inconsistent. Prints may show gaps, weak walls, missing layers, or rough surfaces.
Q4. Why is my first layer too rough?
A rough first layer usually means the nozzle is too close to the bed, the flow is too high, the temperature is too hot, or the build plate has residue. Start with Z-offset and bed cleaning before changing flow.
Q5. What is the best way to troubleshoot a failed print?
Identify the symptom, check the simplest causes first, and change one setting at a time. Start with bed adhesion, Z-offset, filament condition, nozzle flow, and slicer profile. Then move on to more advanced settings such as retraction, flow calibration, pressure advance, and acceleration.
- Quick 3D Printing Troubleshooting Chart
- Before You Change Settings, Check the Basics
- First-Layer Problems
- Print Not Sticking to the Bed
- Messy First Layer
- Warping, Curling, and Layer Separation
- Corners Lifting From the Bed
- Cracks Between Layers
- Extrusion Problems
- Under-Extrusion
- Over-Extrusion
- Nozzle Clogs
- Stringing and Oozing
- Layer Shifting and Motion Issues
- Surface Quality Problems
- Blobs and Zits
- Rough Top Layers
- Ringing or Ghosting
- Filament Problems
- Material-Specific Troubleshooting Tips
- Common Troubleshooting Mistakes to Avoid
- FAQs about 3D Printing Troubleshooting
- Q1. Why does my 3D print fail halfway through?
- Q2. Should I adjust temperature or retraction first for stringing?
- Q3. How do I know if my nozzle is partially clogged?
- Q4. Why is my first layer too rough?
- Q5. What is the best way to troubleshoot a failed print?
Recommended products


