

 Q2
Q2
 QIDI Box
 Plus 4
 Q1 Pro
 X-Max 3


How to Fix Warping in 3D Printing

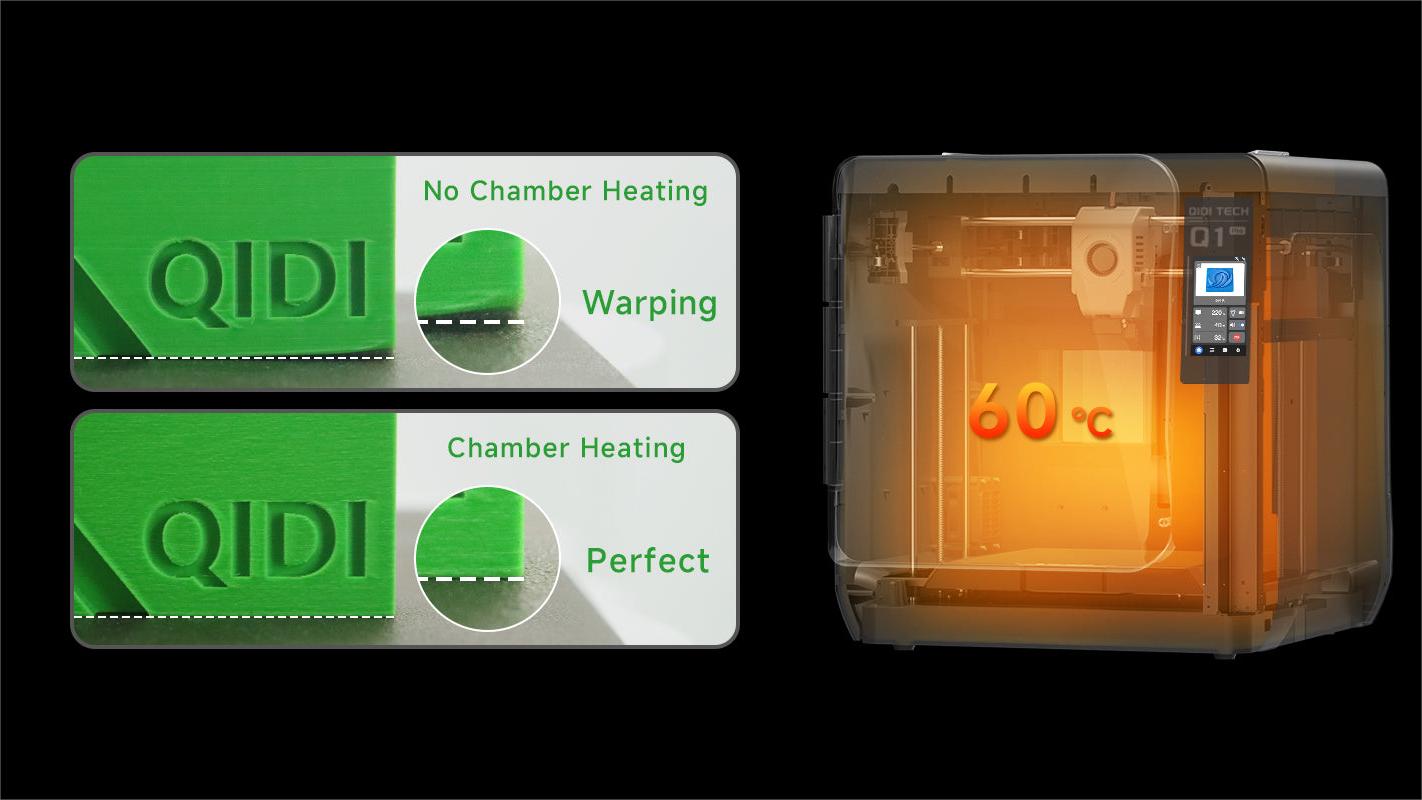
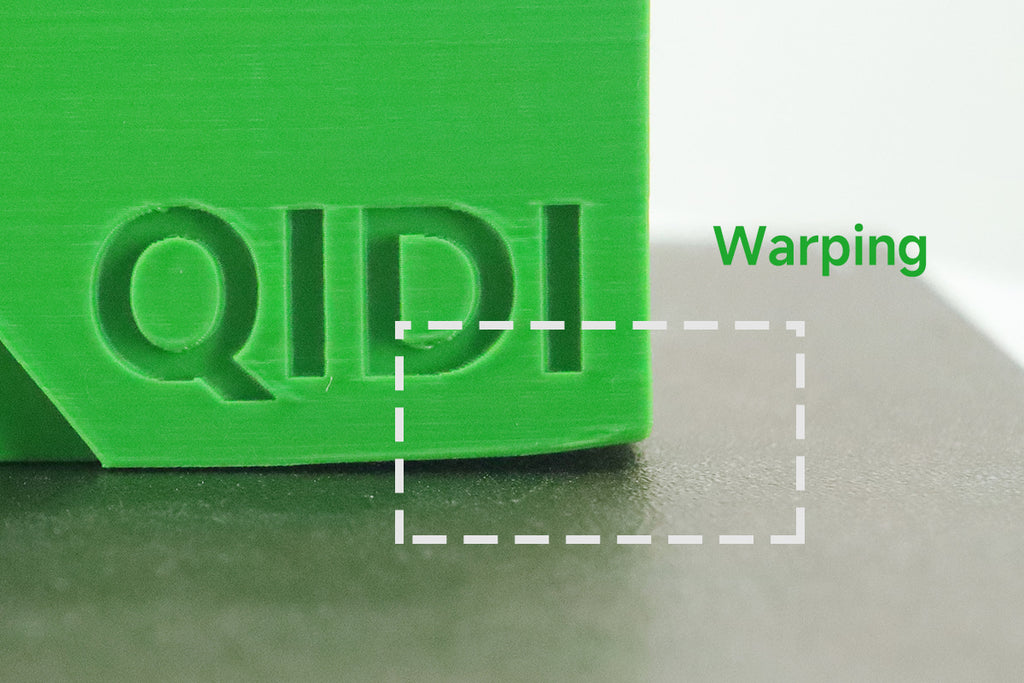
Warping is a 3D print curling up off the build plate because the plastic shrinks as it cools and the corners pull hardest. Fix it by shrinking the temperature gap between the part and the air around it: heat the bed, enclose the printer, kill the drafts, then add a brim. Everything else is a refinement of those four moves.
What Causes Warping in 3D Printing?
Warping is thermal contraction fighting bed adhesion, and losing. Every layer is deposited hot and immediately begins to shrink. Layers already stuck to the plate cannot shrink freely, so the stress accumulates inside the part. When that stored stress exceeds the grip of the first layer, the corners lift — corners first, because that is where two shrinking directions meet.
Plastics are unusually bad at this. Polymers expand and contract roughly ten times more than metals over the same temperature change, as documented in a study of the thermal expansion of plastics used for 3D printing. A steel build plate barely moves while the ABS bonded to it tries to get 1–2% smaller.
In practice, five triggers account for nearly every warped print. They all trace back to the same mechanism.
1. Uneven or Insufficient Bed Heating
If your print bed does not hold an even temperature, the bottom layers cool and shrink at different rates across the plate. This is a bigger problem on large prints that cover most of the build area, where the edges run cooler than the centre.
2. Cold or Drafty Surroundings
An open window, an air conditioning vent, or a printer sitting in an unheated garage all do the same thing: they widen the temperature gap between the freshly extruded plastic and the air, which maximises shrinkage stress. This is the most common cause people overlook, and the cheapest to fix.
3. Printing Too Fast on High-Shrinkage Materials
When you print at high speeds, each layer has less time to bond before the next one arrives and less thermal mass to hold heat. On PLA this rarely matters; on ABS and ASA it does.
4. Wrong Slicer Settings
Full part cooling on ABS, no brim on a large flat part, or a first layer printed too thin all reduce the grip that has to resist the shrinkage. A fused filament fabrication process is only as stable as its first layer.
5. Dirty or Worn Print Bed
A bed with skin oils or leftover residue cannot hold the part down, so even normal shrinkage lifts the corners. This is the first thing to rule out, because it costs nothing.
Warping Risk and Settings by Material
How much you have to do about warping depends almost entirely on which polymer is on the spool. The table below is the practical version of that decision.
| Material | Warp risk | Bed temperature | Enclosure / chamber | Part fan | Adhesion aid |
| PLA | Low | 50–60 °C | Not needed | 50–100% | Rarely needed |
| PETG | Low | 70–85 °C | Not needed | 30–50% | Glue stick as a release layer, not a grip aid |
| ABS | High — 1–2% shrinkage | 90–110 °C | Heated chamber strongly recommended | 0%, bridges only | Brim, and glue for large footprints |
| ASA | High | 100–110 °C | Heated chamber strongly recommended | 0%, bridges only | Brim |
| Nylon (PA) | High | 70–110 °C | Warm and enclosed | 0–20% | Dedicated PA sheet or glue |
| PC and PC blends | High | 100–110 °C | Heated chamber strongly recommended | 0–20% | Brim plus glue |
| Carbon- and glass-filled grades | Lower than the base polymer | As base polymer | As base polymer | 0–20% | Fibre loading reduces shrinkage |
Prusa's ABS material reference puts the shrinkage factor at roughly 1–2% and lists "requires printer enclosure" as a hard requirement rather than a suggestion. That single figure explains why ABS warps and PLA mostly does not: 1–2% across a 200 mm part is 2–4 mm of contraction looking for somewhere to go.
Why Filled Filaments Warp Less
Carbon and glass fibres barely move with temperature, so a filled grade contracts less than the neat polymer it is based on. That is why a carbon-filled nylon is far more forgiving than plain nylon on the same machine. The trade-off is abrasion — filled filaments need a hardened or bimetal nozzle. Our guide to carbon fibre filament covers the details.
Warping Symptoms and What to Change
Warping does not always look the same, and the shape of the failure points at the cause.
| What you see | Most likely cause | Change this first |
| Corners lift within the first 10–20 layers | Bed too cool or plate contaminated | Clean the plate, raise bed temperature, add a brim |
| Corners lift only after the print gets tall | Accumulated shrinkage stress; ambient too cold | Enclose the printer; heat the chamber for ABS and ASA |
| One side lifts and the other holds | A draft, or uneven bed heating | Move the printer away from vents; check plate flatness |
| The whole part detaches and gets dragged | First layer never adhered | Reset Z-offset, then re-level |
| Overhang edges curl upward mid-air | Insufficient part cooling on that feature | Raise fan on overhangs only; slow the outer wall |
| Base stays flat but the part bows in the middle | Shrinkage in a large flat plate-like model | Add ribs, split the part, or reorient it |
How to Fix Warping in 3D Printing
1. Use a Properly Heated Print Bed
A heated bed keeps the base of the print above the temperature where it would contract hard. Preheat before starting so the plate is at a stable temperature rather than climbing through the first layer. Insulating the underside of the bed with insulation tape helps it hold that temperature evenly across the whole surface. Printers built for engineering materials go further — the QIDI Plus 5 heats its bed to 120 °C, which covers the highest bed temperatures that ABS, ASA and PC blends ask for.
2. Enclose the Printer, and Heat the Chamber If the Material Needs It
An enclosure traps the heat the bed radiates and holds a warm pocket of air around the part, which keeps the whole model closer to a single temperature. An actively heated chamber goes one step further by holding a set point regardless of room conditions. QIDI's Q2, Plus 5 and Max4 all run a 65 °C actively heated chamber; the entry-level Q2C uses a flame-retardant enclosure without a chamber heater, so it behaves like a passive box — fine for PLA and PETG, harder work for ABS. Our article on the temperature-controlled chamber explains what the set point actually buys you, and why an enclosure matters covers the passive case.

3. Put the Printer Somewhere Sensible
Where you place your 3D printer has a real effect. Keep it away from windows, doors, and air vents that create drafts and uneven cooling, and out of direct sunlight, which heats one side of the machine and not the other. A spot with stable temperature and humidity solves warping problems that no slicer setting can.
4. Turn the Cooling Fan Down for High-Shrinkage Materials
Part cooling fans exist to freeze overhangs quickly. On ABS, ASA and nylon that is exactly the wrong behaviour: it maximises the temperature difference between one layer and the next. Run the fan at 0% for these materials and let the slicer switch it on only for bridges. On PLA, keep it high — PLA needs the cooling and barely warps. Prusa's warping troubleshooting page reaches the same conclusion.
5. Improve Bed Adhesion Deliberately
Getting the part to stay stuck is the other half of the equation. Modern spring-steel PEI plates grip well when clean, so start there rather than reaching for adhesives. Where you do need more grip:
- Add a brim — 5–10 mm of extra first-layer area around the part is the highest-value change you can make on a warp-prone print. It adds grip exactly at the corners where lifting starts.
- Use a glue stick — on textured PEI it adds grip for ABS and nylon; on smooth PEI with PETG it acts as a release layer instead.
- Increase first-layer width and slow it down — more contact area, better bonded.
- Match the plate to the material — a textured dual-sided PEI plate handles most engineering materials well.
6. Fine-Tune Your Slicer Settings
Print a little slower on high-shrinkage materials so each layer has time to bond. Keep the nozzle temperature in the upper part of the material's range for better layer welding, but not so high that the part stays soft. Rafts and brims both add adhesion area; a brim is usually enough and wastes far less plastic. If a print has already started lifting, some makers rescue it mid-job — this mid-print warping rescue writeup shows one approach, though prevention is far more reliable.
7. Keep the Print Bed Clean
Make sure to regularly clean your print bed, removing dirt, dust, skin oils, and leftover material that get in the way of adhesion. If the plate is scratched, dented, or has a lifted coating, replace it — no setting compensates for a damaged surface.

8. Use Dry, Consistent Filament
Cheap filament with inconsistent diameter gives you an inconsistent first layer, which gives the corners a head start. Damp filament is worse still: steam voids reduce the bonded area within each layer. Follow the drying guidance on the spool, and store spools properly — our guides to filament storage and filament lifespan cover the specifics. Browse the filament range for materials with published spec sheets.
Design Changes That Reduce Warping
Some warping is designed in. Large flat bottoms concentrate the most stress at the perimeter, so:
- Add fillets or chamfers to base corners so there is no sharp point for stress to concentrate at.
- Break up large flat areas with cutouts or split the part and join it after printing.
- Add mouse ears — small printed discs at the corners that add adhesion area and are trimmed off afterwards.
- Reorient the part so the largest flat face is not on the plate, if the geometry allows it.
FAQs About Warping and Curling
Q1: How do I fix 3D print warping?
Work in this order: clean the plate, raise the bed temperature to the top of the material's range, stop the drafts by enclosing the printer, turn the part cooling fan down or off for ABS and ASA, and add a 5–10 mm brim. If corners still lift on ABS after all of that, the material needs an actively heated chamber rather than a passive enclosure.
Q2: Why are my 3D print corners curling up?
Corners lift first because contraction acts along both X and Y there, so the upward force is highest at exactly the point with the least surrounding material to hold it down. It is a sign that shrinkage stress has beaten bed adhesion — treat it as a warping problem, not a leveling problem.
Q3: Does a brim actually stop warping?
It buys you adhesion area, which is often enough on borderline cases and on parts with small footprints. It does not reduce the internal stress, so on a large ABS part in a cold room a brim only delays the lift. Use it together with heat, not instead of it.
Q4: Can PLA warp?
Yes, but rarely, and usually for a different reason. PLA has low shrinkage, so PLA warping is normally a bed adhesion failure — a dirty plate, a Z-offset that is too high, or a bed running too cool. Fix adhesion before touching temperature.
Q5: Is an enclosure enough, or do I need a heated chamber?
For PLA and PETG, neither is required. For ABS, ASA and PC, a passive enclosure helps a lot and an actively heated chamber is what makes results repeatable, because a passive box drifts with the room while a heated chamber holds its set point. Large parts are where the difference shows up most.
Q6: Does printing slower help with warping?
A little, on high-shrinkage materials, because each layer has more time to bond to the one below. It is a second-order fix. Ambient temperature and bed adhesion matter far more, and slowing a whole print is an expensive way to buy a small improvement.
Say Goodbye to Warping
Warping comes down to one mechanism — plastic shrinks as it cools, and the corners lose the fight against bed adhesion first. Narrow the temperature gap with a hot bed and an enclosure, remove the drafts, cut the fan on high-shrinkage materials, and give the first layer more area to hold on with. Match the effort to the material: PLA needs almost none of this, and ABS needs all of it.
Read More
- What Causes Warping in 3D Printing?
- 1. Uneven or Insufficient Bed Heating
- 2. Cold or Drafty Surroundings
- 3. Printing Too Fast on High-Shrinkage Materials
- 4. Wrong Slicer Settings
- 5. Dirty or Worn Print Bed
- Warping Risk and Settings by Material
- Why Filled Filaments Warp Less
- Warping Symptoms and What to Change
- How to Fix Warping in 3D Printing
- 1. Use a Properly Heated Print Bed
- 2. Enclose the Printer, and Heat the Chamber If the Material Needs It
- 3. Put the Printer Somewhere Sensible
- 4. Turn the Cooling Fan Down for High-Shrinkage Materials
- 5. Improve Bed Adhesion Deliberately
- 6. Fine-Tune Your Slicer Settings
- 7. Keep the Print Bed Clean
- 8. Use Dry, Consistent Filament
- Design Changes That Reduce Warping
- FAQs About Warping and Curling
- Q1: How do I fix 3D print warping?
- Q2: Why are my 3D print corners curling up?
- Q3: Does a brim actually stop warping?
- Q4: Can PLA warp?
- Q5: Is an enclosure enough, or do I need a heated chamber?
- Q6: Does printing slower help with warping?
- Say Goodbye to Warping
- Read More
Recommended products






