

 Q2
Q2
 QIDI Box
 Plus 4
 Q1 Pro
 X-Max 3


How to Prevent Layer Shifting

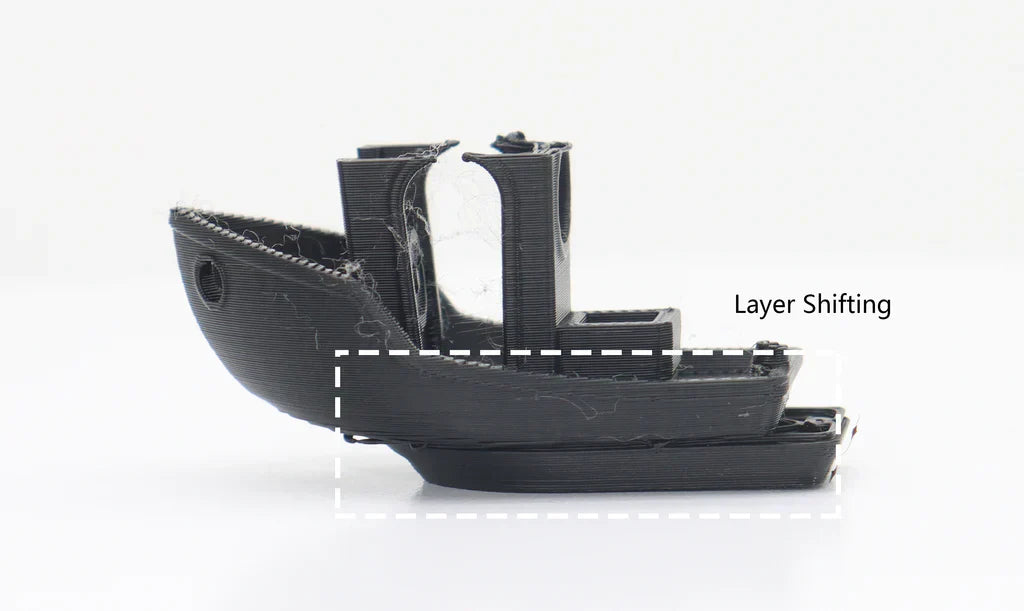
Layer shifting is a print failure in which the toolhead loses its commanded position on the X or Y axis mid-print, so every layer above the fault line is offset sideways from the layers below it. The cause is almost always mechanical: a loose belt, a slipping pulley grub screw, friction in the motion system, a nozzle collision, or an overheating stepper driver.
The diagnosis is faster than most people expect, because the shape of the shift tells you where to look. A single clean offset points at a collision. Repeated staircase offsets point at belts or pulleys. A shift that only appears on fast prints points at acceleration. Below is the full symptom-to-cause table, then the checks in the order worth doing them.
What Layer Shifting Is
A layer shift means the printer's motion system did not execute a commanded move, and the firmware never found out. Stepper motors on a typical FDM printer run open-loop: the controller sends step pulses and assumes the motor turned. If the motor stalls, or the belt slips on the pulley, or the pulley spins on the motor shaft, the physical position and the firmware's idea of the position diverge — permanently, for the rest of the print.
That is why the defect never corrects itself. Once the origin has moved, every subsequent layer is printed correctly relative to a wrong reference. The visible result is the characteristic stair-step, and the fix is always to remove whatever caused the loss of steps, not to change slicer settings after the fact.
Prusa's knowledge base states the top cause plainly: layer shifts are most often caused by wrong belt tension or pulleys that are not secure, with loose or misaligned motor pulleys described as the usual cause of staircase-pattern shifts. That matches what I see on failed prints: hardware first, electronics second, software a distant third.

Layer Shift Diagnostic Table
Read the failed print before you touch a tool. The pattern of the shift narrows the cause down to one or two candidates.
| What the failure looks like | Most likely cause | How to confirm | Fix |
|---|---|---|---|
| One clean offset at a single height, straight afterwards | Nozzle collided with the print | Look for a curled corner, a blob, or a scar at exactly that height | Enable Z-hop of 0.2–0.4 mm and fix the warping or blobs causing the obstacle |
| Repeated staircase offsets, always the same direction | Loose belt or pulley grub screw on that axis | Press the longest belt span: more than a few millimetres of give is too loose | Re-tension the belt, then seat the grub screw on the flat of the motor shaft |
| Shifts on X only, Y is clean | X belt tension or X pulley | Move X by hand with the printer off — resistance should be even end to end | Tension X, check the X idler bearing spins freely |
| Shifts on both axes on a CoreXY machine | One of the two crossed belts, or a corner idler | Move the toolhead diagonally by hand; a CoreXY diagonal uses one motor only | Match tension across both belts, then check every idler pulley for wobble |
| Shifts only on tall prints, hours in | Stepper driver overheating and thermally shutting down | Touch the driver heatsink after a failure; check the electronics fan is spinning | Clean or replace the electronics fan, improve airflow, lower motor current slightly |
| Shifts only on fast prints or models with many sharp corners | Acceleration exceeding what the motors can deliver | Reprint the same file at 75% speed — if it survives, it is mechanical stress | Reduce print speed 20–25%, then lower acceleration and square corner velocity |
| Shift always happens at roughly the same layer of the same file | Corrupted G-code or a failing SD card | Reslice and print from a different medium such as USB or network | Replace the SD card, reslice the model, update slicer and firmware |
| Grinding or notchy feel when moving an axis by hand | Debris on the rail, dry bearing, or a bent rod | With the printer cold and off, run each axis through full travel by hand | Clean and re-lubricate; replace the bearing or rod if the notch persists |
| Whole print is offset but layers are individually clean | Homing fault — endstop or probe triggered early | Home the axis repeatedly and watch for an inconsistent stop point | Check the endstop mount is tight and free of filament debris |
| Motors audibly buzz or click at the moment of the shift | Insufficient motor torque — current set too low, or motor overheated | Motor is too hot to hold a finger on after the print | Raise driver run current in small steps, or improve motor cooling |
| Small, repeated ripples rather than a hard offset | Not a layer shift — this is ringing from frame resonance | Artefacts appear after corners and decay along the wall | Tighten the frame, then run input shaping and reduce acceleration |
| Print bed rocks when nudged by hand | Loose carriage wheels or bed mounting | Grip the bed and try to rock it — any play at all is too much | Adjust the eccentric nut on the carriage wheels, tighten bed mounts |
Step 1: Belt Tension and Pulley Security
Check belts and pulleys first, because they cause the majority of layer shifts and take five minutes to inspect. A correctly tensioned belt feels firm with very little give when pressed at the middle of its longest free span.
Too loose and the belt skips teeth on the pulley under acceleration. Too tight and you load the motor bearings, increase friction, and eventually deform the belt. Some manufacturers publish actual target values rather than leaving it to feel — Prusa documents an approximate belt status reading of 250 on X and 275 on Y, with ±15 as the acceptable band on the MK3 series, treating anything under 240 as too loose and over 290 as too tight. Your machine's scale will differ, but the principle holds: belt tension is a specification you can verify, not a judgement call.
Then check the drive pulley. It is the small toothed gear on the motor shaft, held by one or two grub screws. One of those screws must land on the flat machined section of the shaft — if both sit on the round part, the pulley will eventually rotate on the shaft and you get a shift that no amount of belt tensioning will fix. While you are there, sight down the belt path and confirm the pulley is aligned so the belt is not rubbing on a flange.
Prusa also describes a useful hand test: with the printer cold and powered off, move the toolhead along X, along Y, and along both diagonals. An inconsistency in straight X or Y movement points at belt tension, while an inconsistent diagonal points at the motor driving that diagonal or its pulley. On CoreXY machines this test is especially informative, since a pure diagonal move is driven by a single motor.
Step 2: Friction in the Motion System
Any friction the motors have to overcome eats into the torque margin that prevents skipped steps. The axes should move through their full travel by hand with no notches, no grinding, and no sticky spots.
Wipe the linear rods and lead screws with a lint-free cloth to remove contaminated grease and dust, then re-lubricate: light machine oil on smooth rods, a heavier lithium or PTFE grease on threaded lead screws. Move each axis end to end by hand afterwards. A notch you can feel is a failing bearing or a bent rod, and no lubricant will fix it.
Also check cable routing. A drag chain or wire loom that snags at one end of travel adds load exactly where the toolhead is already decelerating, and it produces shifts that only appear when a print reaches a particular region of the plate. Filament debris jammed in a rail does the same thing. Both are on Prusa's list of causes and both are easy to miss because they are invisible when the toolhead is parked in the centre.
Step 3: Stepper Motors and Drivers
If the mechanics are clean and shifts continue, the cause is electrical: either the motor is not receiving enough current to complete the move, or the driver is overheating and shutting down to protect itself.
Motors get warm in normal use. They should not be too hot to keep a finger on. Stepper motors lose torque as they heat, so a hot motor is both a symptom and a cause. The driver chips on the mainboard are the more common failure point: when the electronics-bay fan clogs with dust, the drivers reach thermal shutdown, drop the motor for a moment, and lose steps. Klipper's TMC driver documentation is explicit that overheated drivers disable themselves and raise errors, and that motors running hot suffer reduced torque and accuracy. Keeping that fan clean is genuinely one of the highest-value maintenance tasks on the machine.
Motor current is the other lever. Klipper's guidance is to prefer higher run current as long as the motor does not get too hot and the driver reports no warnings. Too little current and the motor is weak and skips; too much and both motor and driver overheat, which produces the same skip by a different route. On older boards this is a physical potentiometer measured with a multimeter on a live mainboard, and it carries a real risk of shorting something expensive — treat it as a last resort and read your model's official procedure first.
One more driver-level detail worth knowing: the same Klipper documentation notes that stealthChop mode introduces roughly 75% of a full step of positional lag during constant-velocity moves compared with spreadCycle, and recommends sticking to one mode consistently rather than switching. Prusa makes the practical version of the same point by advising you to run the printer in normal mode rather than stealth mode when chasing layer shifts. Quiet modes trade a little positional authority for silence.
Step 4: Frame and Bed Rigidity
A rigid frame is a prerequisite for everything above. Vibration in the structure lets a marginally loose belt slip, and it wastes motor torque that should be moving the toolhead.
Go over every structural fastener, particularly on kit-built machines where screws loosen over months of vibration. Then grip the print bed and try to rock it — there should be no play whatsoever. Carriage systems that ride on wheels in aluminium extrusion normally have one eccentric nut per carriage: a hex nut with an off-centre bore that moves its wheel closer to or further from the rail. Turn it until the wheels are firm but the carriage still rolls freely by hand.
Frame stiffness has a measurable threshold, not just a subjective one. Klipper's resonance compensation documentation notes that a measured resonance frequency below roughly 20–25 Hz means the printer itself should be stiffened rather than compensated for in software. This is one of the structural reasons enclosed CoreXY machines with a fixed Z bed — the X-Max 3 and Max4 among them — hold position better at speed than open cantilever designs: the heavy bed never accelerates, so there is far less mass being thrown back and forth.

Step 5: Stop the Nozzle Hitting the Print
Nozzle collisions produce the cleanest, most recognisable layer shift: one offset, at one height, with a visible scar. The toolhead hits a raised obstacle during a travel move and the impact knocks an axis off its step count.
Two obstacles cause almost all of them. The first is a warped corner that has lifted off the plate into the travel path — the root cause there is adhesion, covered in how to fix warping and, for the first layer specifically, in the first layer problems guide. The second is a hardened blob of plastic left by imperfect retraction or an oozing nozzle.
The immediate mitigation is Z-hop: the toolhead lifts a fixed amount before each travel move so it clears minor obstacles. Set it to 0.2–0.4 mm. Every mainstream slicer has the setting — we cover where to find it across packages in the slicer software overview. Z-hop costs a little print time and slightly increases stringing risk, which is a good trade against losing an eight-hour print.
Deal with the root cause as well. Clean bed adhesion prevents lifted corners; tuned retraction and temperature prevent blobs. A worn nozzle that drools between moves is worth replacing outright — a hardened steel nozzle holds its geometry far longer with abrasive filaments, and routine nozzle maintenance keeps the drool down.
Step 6: Speed and Acceleration Settings
High speed does not cause layer shifts on a healthy machine — it exposes weaknesses that a slow print would hide. Use a speed reduction as a diagnostic, then fix what it revealed rather than living at the lower speed permanently.
| Setting | Diagnostic change | What the result tells you |
|---|---|---|
| Overall print speed | Reduce 20–25% and reprint the same file | If the shift disappears, the fault is mechanical stress — go back to belts, friction, and current |
| Acceleration | Halve it, or set it below the band where ringing first appears | Shifts that stop with lower acceleration mean the motors were being asked for more torque than they had |
| Square corner velocity / jerk | Klipper's default is 5.0 mm/s; try lowering it | Direction changes are the highest-torque moment in a print |
| Travel speed | Reduce by 30% | If only travel-related collisions stop, the problem was impact, not torque |
| Input shaping | Run the tuning tower: START=1500, STEP_DELTA=500, STEP_HEIGHT=5 | Identifies the highest acceleration your frame tolerates without ringing |
That tuning-tower recipe comes straight from Klipper's resonance compensation docs: acceleration bands starting at 1500 mm/s² and increasing by 500 mm/s² every 5 mm of height, printed at 0.2–0.25 mm layers with external perimeters around 80–100 mm/s. It gives you a defensible acceleration ceiling instead of a guess. QIDI machines run a Klipper fork, so these tools are available directly on the printer. For context on what a properly tuned motion system can sustain, we measured it in FDM printing at 600 mm/s.
Step 7: Test Systematically With Calibration Cubes
Verify every fix with a small, fast test print rather than the failed job. A 20 mm calibration cube prints in minutes and its sharp vertical corners make any shift immediately obvious.
The method is simple and it is the only one that produces knowledge: change one thing, print one cube, record the result. If the shift is gone, you have found the cause. If it remains, undo the change and move to the next candidate. Changing three things and getting a good cube tells you nothing about which one mattered, and the failure will come back.
For a slightly harder test once cubes pass, print a 3DBenchy — its overhangs and small features load the motion system in more directions. We cover how to read one in the 3DBenchy guide, and the underlying measurement routine is in the calibration walkthrough. This iterative loop also uses very little material — a box of test cubes costs less than one failed large print, and consistent-diameter filament keeps the variable out of the experiment.
Preventive Maintenance Schedule
Most layer shifts are preventable with a maintenance routine that takes fifteen minutes a month. The components that cause shifts are all wear items or fastener items, and both degrade on predictable timescales.
| Interval | Task | Why it prevents shifts |
|---|---|---|
| Every print | Check the plate is clean and the previous print is fully removed | Leftover debris is the most common collision obstacle |
| Monthly | Press-test belt tension on every axis | Belts stretch gradually; you will not notice until it fails |
| Monthly | Move each axis by hand through full travel | Finds notchy bearings and debris before they cost you a print |
| Every 3 months | Clean and re-lubricate rods and lead screws | Old grease collects dust and turns into a friction paste |
| Every 3 months | Check pulley grub screws and frame fasteners | Vibration loosens them; a slipping pulley is the classic staircase shift |
| Every 6 months | Clean the electronics-bay fan and filter | Dust-blocked airflow leads to driver thermal shutdown on long prints |
| As needed | Replace worn nozzles | A drooling nozzle leaves blobs the toolhead later hits |
If shifts keep returning on a machine that passes all of these checks, the frame or motion design may simply be at its limit for the speeds you are asking for. That is a hardware conversation rather than a tuning one, and the current printer range is where to compare rigid enclosed platforms against open designs. For defects that look similar but are not shifts, missing layers and the general troubleshooting guide cover the neighbouring symptoms.
Frequently Asked Questions About Layer Shifting
What causes layer shifting in 3D printing?
Loose belts and unsecured motor pulleys are the most common causes, followed by friction in the motion system, nozzle collisions with the print, overheating stepper drivers, and acceleration set higher than the motors can deliver. Corrupted G-code from a failing SD card is a rarer software-side cause.
How do I know if my belt is too loose?
Press the middle of the longest free span of the belt. It should feel firm with only a few millimetres of give. If it deflects easily or you can hear it slap during fast moves, it needs tensioning. Some manufacturers publish numeric targets — Prusa specifies an approximate belt status of 250 on X and 275 on Y with a ±15 band for the MK3 series.
Why did my print shift only once and then print fine?
That pattern is a nozzle collision. The toolhead hit a lifted corner or a hardened blob during a travel move, lost steps once, and then continued normally from the new position. Enable Z-hop of 0.2–0.4 mm and fix the underlying warping or oozing that created the obstacle.
Can printing too fast cause layer shifts?
Speed by itself does not, but it exposes marginal hardware. A slightly loose belt or a stiff bearing that is harmless at 60 mm/s becomes a skipped step at 300 mm/s with aggressive acceleration. Reduce speed 20–25% as a diagnostic; if the shift stops, treat that as evidence of a mechanical fault to fix, not a permanent speed limit.
Does Z-hop fix layer shifting?
Z-hop fixes collision-induced shifts by lifting the nozzle over obstacles during travel moves, and it does nothing for shifts caused by belts, pulleys, friction, or drivers. Use it as insurance alongside the mechanical checks, not instead of them.
How tight should stepper motor current be set?
High enough that the motor never stalls, low enough that neither the motor nor the driver runs hot. Klipper's driver documentation advises preferring higher current values as long as the motor does not get too hot and the driver reports no warnings. A motor you cannot hold a finger on is too hot and is losing torque as a result.
Why does my printer shift layers only on tall prints?
Long prints give stepper drivers time to reach thermal shutdown. Check that the electronics-bay fan is clean and spinning, and feel the driver heatsinks after a failure. Motor heat soak has the same effect: torque falls as the motor warms, so a move that succeeded in hour one fails in hour six.
Is layer shifting the same as ringing?
No. A layer shift is a permanent positional offset — everything above the fault line is displaced. Ringing is a decaying ripple that appears after sharp corners and fades along the wall, caused by frame resonance. Ringing is fixed with input shaping and lower acceleration; a layer shift is fixed by finding the lost motion.
- What Layer Shifting Is
- Layer Shift Diagnostic Table
- Step 1: Belt Tension and Pulley Security
- Step 2: Friction in the Motion System
- Step 3: Stepper Motors and Drivers
- Step 4: Frame and Bed Rigidity
- Step 5: Stop the Nozzle Hitting the Print
- Step 6: Speed and Acceleration Settings
- Step 7: Test Systematically With Calibration Cubes
- Preventive Maintenance Schedule
- Frequently Asked Questions About Layer Shifting
- What causes layer shifting in 3D printing?
- How do I know if my belt is too loose?
- Why did my print shift only once and then print fine?
- Can printing too fast cause layer shifts?
- Does Z-hop fix layer shifting?
- How tight should stepper motor current be set?
- Why does my printer shift layers only on tall prints?
- Is layer shifting the same as ringing?
Recommended products






