 Q2
Q2
 QIDI Box
 Plus 4
 Q1 Pro
 X-Max 3


A Guide to Printing the 3DBenchy and Interpreting the Results

The 3DBenchy is a popular 3D model of a small boat used to test and benchmark 3D printers. It was designed by Creative Tools to quickly check a printer's performance on many different challenges at once. In a single, short print, it evaluates crucial functions like dimensional accuracy, cooling, and the ability to print bridges. Since the model is printed without any supports, the result shows you what your printer can achieve on its own. This guide provides simple steps for printing a Benchy, analyzing the outcome, and fixing common print quality problems.
How to Print a Baseline 3DBenchy
Before you can analyze the results, you need a benchmark print. This process involves using the official file and standard settings to create a good baseline for comparison.
Download the Official Model
First, make sure you're using the official 3DBenchy file. Using the standardized model is important so you can accurately compare your results to other benchmarks. You can download the official STL file directly from sources like Printables, Thingiverse, or the official 3DBenchy.com website.
Baseline Slicer Settings for PLA
The goal of the first print is to test your printer's standard performance, not to produce a perfect model immediately. Use these baseline settings in your slicer without extensive tweaking.
- Layer Height: 0.2 mm
- Infill: 10-20% with a Grid or Gyroid pattern
- Print Speed: 50 mm/s
- Nozzle Temperature: 200-210°C, or follow the filament manufacturer's recommendation
- Bed Temperature: ~60°C for PLA
- Cooling Fan: 100% speed after the first few layers
You must disable all supports and adhesion assistants like rafts or brims. The 3DBenchy is designed specifically to test the printer's ability to handle these challenges on its own.
Printer Pre-Print Checklist
A few simple checks before you begin can prevent common failures.
- Confirm the print bed is level and clean. An unlevel bed is a primary cause of print failures.
- Check that the filament is loaded correctly and the spool is free of tangles.
- Verify that the nozzle is clean and clear of any old filament debris.
Once everything is ready, start the print. Watch the first layer carefully, as its quality is critical for the rest of the print.

How to Interprete Your 3DBenchy's Results
With your Benchy printed, it's time for a detailed inspection. Each feature of the boat is designed to test a specific aspect of your printer's performance.
The Hull: Warping, Ringing, and Layer Consistency
The hull is the largest single part of the model and reveals a lot about overall print quality. Inspect it for layer consistency, ghosting (also called ringing), and warping. A good result is a hull with smooth, even sides and a sharp bow that doesn't droop. There should be no signs of lifting or warping at the corners where the boat touched the print bed.
Common problems include visible horizontal lines or banding, which can indicate a mechanical issue with the Z-axis (Z-wobble). Ripples appearing after corners are a sign of ghosting, often caused by frame vibrations. If the hull lifted off the bed, you have a bed adhesion or warping issue.
Drooping Overhangs & Bridges: Cooling Efficiency
The steep curve of the bow and the arches of the cabin test your printer's part cooling. The flat roof of the cabin, which is printed over open air, specifically tests bridging. For these features, a good result is a smooth, downward-curving surface with minimal sagging, curling, or messy lines on the underside.
If you see drooping or stringy messes under the overhangs and bridges, it is a clear sign of insufficient cooling, meaning the filament didn't solidify fast enough to hold its shape. Printing too fast or at too high a temperature can also contribute to this problem.
Deformed Chimney & Details: Small Feature Resolution
The small, cylindrical chimney and the fine details like the steering wheel test how well your 3D printer handles small perimeters and reproduces fine details. The chimney should be perfectly round with a clean vertical profile. The steering wheel should be distinct, and the text on the rear nameplate should be legible.
A deformed or blobby chimney often results from excess heat buildup due to very short layer times. If the fine details are melted together or unreadable, it suggests your print speed may be too high or your cooling is not effective enough for such intricate work.
Stringing & Surface Gaps: Retraction and Extrusion
The window frames, doorways, and top deck surfaces provide insight into retraction, precision, and extrusion quality. The edges of the windows should be sharp, with no strings of plastic stretching across the gaps. The top surfaces, like the deck, should be smooth and solid with no gaps between the lines.
Stringing or "cobwebs" across openings are classic signs of poorly calibrated retraction settings. Gaps or holes on the top surfaces indicate under-extrusion (calibrate your E-steps or flow rate), while a rough, scarred texture can mean over-extrusion.
How to Fix the Issues Your 3DBenchy Revealed
A flawed Benchy is not a failure; it is a diagnostic tool. Use its imperfections to guide your calibration efforts.
Stringing and Oozing
Seeing little strings or "cobwebs" between parts of your print usually points to a retraction issue. The best place to start is in your slicer by adjusting the retraction distance and speed. It also helps to try lowering your nozzle temperature a few degrees at a time. Lastly, make sure your filament is dry—damp filament loves to ooze and string.
Warping and Poor Bed Adhesion
When the corners of the boat lift up from the print bed, that’s almost always a first-layer issue. First, re-level your bed and double-check that your Z-offset is dialed in. A super clean build surface is also key, so give it a good wipe with isopropyl alcohol or soap and water. If it’s still not sticking, try bumping up the bed temperature a bit or using a brim on your next print.
Poor Overhangs and Bridges
If the undersides of the steep bow or the cabin roof look messy and droopy, your print isn't getting enough cooling. The main fix is to crank up your part cooling fan speed in the slicer. Printing a little slower and dropping the nozzle temperature can also work wonders, as it gives the plastic time to harden before it has a chance to sag.
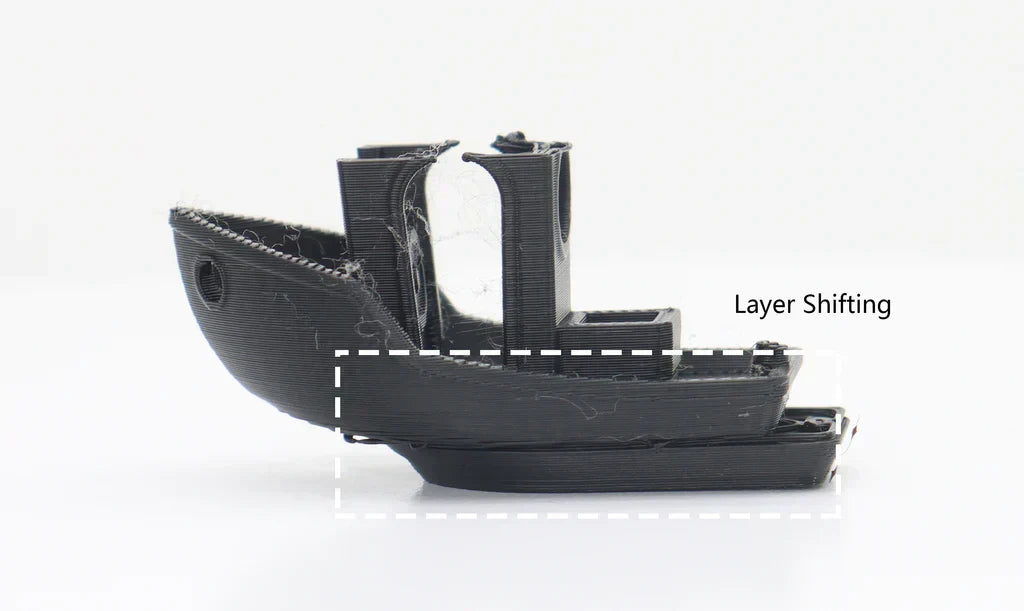
Inconsistent Layers (Z-Wobble)
Noticeable horizontal lines or bands on the hull usually mean there's a mechanical problem. Take a close look at the Z-axis rods for any grime or anything that stops them from moving smoothly; clean and lube them if they need it. It's also a good idea to make sure the printer's frame is solid and that all the main screws and belts are tight to cut down on vibrations.
Gaps, Blobs, and Extrusion Problems
If you see gaps between your print lines (under-extrusion) or the surface looks rough and blobby (over-extrusion), your printer isn't pushing out the right amount of plastic. Start by calibrating your extruder's E-steps so it feeds filament accurately. After that, you can tweak the flow rate (or extrusion multiplier) in your slicer for final adjustments. If you're still having trouble, it might be time to check for a partially clogged nozzle.

Apply the Lessons from Your 3DBenchy!
Your first 3DBenchy provides a vital data point—a map of your printer's current performance. Approach calibration as an iterative process. Make only one adjustment at a time, then print the Benchy again to see the specific effect of that change. This methodical approach is the key to improving your printer's output. The lessons from this small boat will translate to higher quality and greater reliability for all your future 3D printing projects.
- How to Print a Baseline 3DBenchy
- Download the Official Model
- Baseline Slicer Settings for PLA
- Printer Pre-Print Checklist
- How to Interprete Your 3DBenchy's Results
- The Hull: Warping, Ringing, and Layer Consistency
- Drooping Overhangs & Bridges: Cooling Efficiency
- Deformed Chimney & Details: Small Feature Resolution
- Stringing & Surface Gaps: Retraction and Extrusion
- How to Fix the Issues Your 3DBenchy Revealed
- Stringing and Oozing
- Warping and Poor Bed Adhesion
- Poor Overhangs and Bridges
- Inconsistent Layers (Z-Wobble)
- Gaps, Blobs, and Extrusion Problems
- Apply the Lessons from Your 3DBenchy!
Recommended products


