

 Q2
Q2
 QIDI Box
 Plus 4
 Q1 Pro
 X-Max 3


How to Fix Missing Layers in Your 3D Prints: A Complete Guide

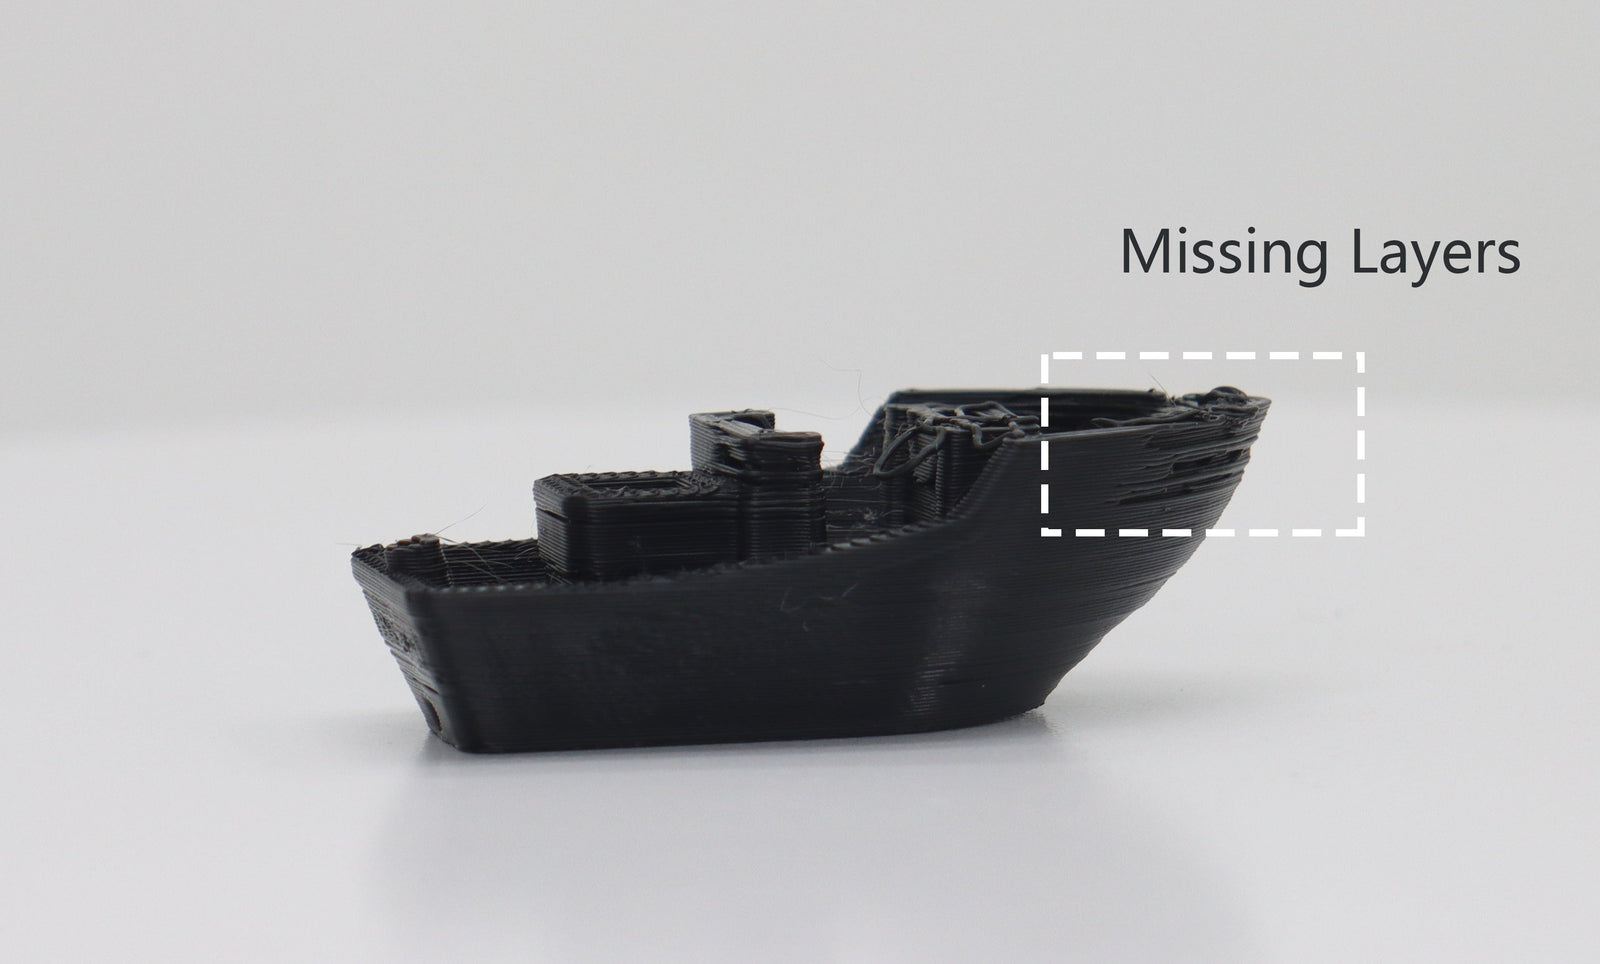
Missing layers have exactly two root causes: the filament stopped coming out, or the Z axis stopped moving up. Extrusion faults account for the large majority. Check the spool, the nozzle and the hotend cooling fan first; only then look at the lead screw, the motor coupler and the gantry.
If you are looking at a print with gaps or hollow bands running through it, that is a missing layer, and it is not the same thing as layer shifting (where the model steps sideways) or layer separation (where layers form but do not bond). Different symptom, different fix. This guide sorts out which one you have and works through the causes in order of how likely they are.
Symptom to Cause to Fix
| What the print looks like | Most likely cause | First action |
|---|---|---|
| One or more clean hollow bands, layers above resume normally | Temporary extrusion stall — tangle or partial clog that cleared itself | Free the spool, cold pull the nozzle |
| Gaps appear repeatedly at a consistent height | Z axis binding at a specific point on the lead screw | Clean and re-lubricate the screw; check it is not bent |
| Layers stop after roughly the same elapsed time each attempt | Heat creep as the hotend saturates | Verify the hotend cooling fan runs at full speed |
| A squashed, over-extruded band instead of a gap | Z axis did not rise — loose motor coupler | Tighten the coupler grub screws on the shaft flat |
| Popping sounds, rough walls, then gaps | Wet filament boiling in the melt zone | Dry the spool before changing anything else |
| Model steps sideways rather than going hollow | Layer shifting, not missing layers | See our guide on layer shifting |
| Layers are present but split apart under load | Layer adhesion, not extrusion | See layer separation and cracking |
| Preview in the slicer already shows the gap | Model or slicing error, not the printer | Re-slice, or repair the mesh |
The Two Primary Causes of Missing Layers
Nearly every instance traces back to one of two categories. Working out which one you have first will save you from disassembling a machine that was never broken. Our general 3D printing troubleshooting guide covers where this failure sits alongside the others.
Cause 1: Extrusion Failure (The Filament Isn't Coming Out)
This is by far the more common of the two. The mechanics are all working, the Z axis is lifting the toolhead correctly, but the nozzle is not extruding the right amount of plastic — or any at all. That is what leaves the void. The tell is that the gap is a clean absence: the layers above and below are correctly positioned, there is just nothing between them.
Cause 2: Mechanical Z-Axis Failure (The Printer Isn't Moving Up)
Less frequent, and it looks different. The extruder and hotend are dispensing normally; the vertical motion system fails to raise the toolhead to the next layer height. The nozzle then prints on top of the layer it just finished, producing a squashed, over-extruded line that reads as a gap higher up or causes a total jam on subsequent layers. If you see crushed material rather than empty space, this is your category.
How to Fix Common Extrusion Problems
Start here. These checks are ordered from easiest and most common to most involved.
1. Check the Filament Spool and Path
First, confirm the filament is feeding properly. A tangled spool is the most common cause of a print failing mid-run. Ensure the spool unwinds freely and has no knots; if you find one, unroll past it and wind the filament back on neatly. Check the whole path for sharp bends. A tight radius in a PTFE guide tube or a restrictive spool holder can create more friction than the extruder motor can overcome.
2. Service the Hotend and Nozzle
Hotend problems are a common culprit. A nozzle blockage from charred filament restricts flow and produces thin or missing layers. Clear it with a cold pull — on a QIDI Q2, Plus 5 or Max4 that means heating the nozzle to 250 °C, hand-feeding PLA until it extrudes cleanly, dropping to 90 °C, then pulling firmly — or by clearing the orifice with a 0.35 mm cleaning needle while it is hot.
Then watch out for heat creep, where heat travels too far up the hotend and softens filament before it should, swelling it into a jam. This is the classic cause of a print that runs perfectly for an hour and then goes hollow, so make sure the hotend cooling fan is clear and spinning at full speed. Replacements are stocked as the Q2 hotend cooling fan and equivalents in Q2 accessories.
3. Inspect the Extruder Mechanism
Several extruder faults produce the same symptom. Check drive gear tension: it should leave light marks on the filament without biting deep enough to deform it. Brush plastic dust out of the gear teeth with a fine wire brush, since accumulation destroys grip. Finally, inspect the extruder arm for hairline cracks if it is a plastic part — a cracked arm loses tension progressively, which is why the failure appears halfway through long prints rather than at the start. Every current QIDI machine uses a direct-drive extruder with hardened-steel dual gears, which removes both the long feed path and the plastic-arm failure mode.

4. Evaluate the Filament Itself
Do not overlook the state of your filament. Most absorb water from the air, which flashes to steam in the hotend and wrecks extrusion — usually audible as popping. If that is what you hear, dry the filament in a dedicated filament dryer before you touch anything mechanical. Diameter inconsistency causes the same symptom for a different reason: measure at several points with digital calipers, and if variation exceeds about ±0.05 mm, replace the spool with better-controlled filament.
How to Fix Mechanical Z-Axis Problems
Once extrusion is ruled out, inspect the vertical motion system.
1. Fix Z-Axis Binding and Alignment
Binding happens when the lead screws or guide rails cannot move smoothly. You may hear the motor straining, or notice the gantry is no longer level. To diagnose it, power off and slowly turn the lead screw by hand, feeling for tight spots. Clean the screws with a lint-free cloth and re-lubricate with an appropriate grease such as white lithium. While you are there, check the screw is not visibly bent — a bent screw produces gaps at the same height on every print, which is a very distinctive signature.
2. Tighten the Z-Axis Motor Coupler
The coupler joins the Z motor shaft to the lead screw. Its grub screws can work loose, letting the motor spin without turning the screw, so the gantry never rises for the next layer. Tighten them — and make sure at least one screw bears on the flat of the motor shaft, not the round section, or it will slip again within a few prints.
3. Check Gantry Guides and Wheels
On machines that ride on V-slot rollers, wheels adjusted too tightly against the frame stop the Z axis moving freely. Locate the wheel mounted on an eccentric nut and turn it slightly to adjust pressure. The target is a gantry that moves smoothly through its full travel with no perceptible wobble. Machines built on linear rails, including the current QIDI range, do not have this adjustment — on those, binding is nearly always a lead screw or lubrication issue instead.
Software Check: Slicer Settings
Software is rarely the primary cause, but two settings are worth reviewing once hardware is clear.
- Retraction distance: set too high, it pulls molten plastic back into the cold zone and causes a temporary jam on resume. On a direct-drive machine, anything above about 1 mm is worth questioning. Try reducing it by 1 mm and re-testing.
- Z-hop / Z-lift: this lifts the nozzle during travel to avoid collisions, but interactions with it can occasionally produce layer gaps. Disable it entirely as a test to see whether the problem disappears.
If the gaps survive both tests, the cause is hardware or filament.
A Final Troubleshooting Checklist
If you are still unsure, start a small test print — a 20 mm calibration cube is ideal — and watch it closely. Here is what to look and listen for.
- Observe the filament path: during the first layers, confirm the filament unwinds smoothly with no snags.
- Listen to the nozzle: popping or hissing is a clear sign of moisture in the filament.
- Watch the extruder gear: is it turning consistently, or slipping and grinding?
- Manually test for clogs: pause with the nozzle hot and push filament through by hand. Easy flow rules out a major blockage.
- Act immediately if a gap appears: power down, check the Z coupler is tight, and test the Z axis by hand for binding.
- Rule out software: re-slice the test model with a default, trusted profile to eliminate an obscure setting.
This active approach connects the symptom directly to its cause instead of replacing parts on a hunch. It is also the fastest way to build a mental model of your specific machine, which is what stops the next failure taking a whole evening.

FAQ
What causes missing layers in 3D prints?
Either extrusion stopped or the Z axis did not rise. Extrusion causes — spool tangles, partial clogs, heat creep, wet filament, a slipping drive gear — account for the large majority. Mechanical causes are a binding lead screw, a loose motor coupler or an over-tight gantry.
Why is my 3D printer skipping layers?
A skipped layer that leaves a clean void is an extrusion stall. One that leaves a crushed, over-extruded band is the Z axis failing to lift. Look at which of the two you have before you start disassembling anything — they need completely different repairs.
Is missing layers the same as layer shifting?
No. Missing layers leave a hollow gap in an otherwise correctly aligned model. Layer shifting displaces everything above a point sideways, and comes from belt tension, a loose pulley or a collision on the X or Y axis.
Why do gaps appear at the same height on every print?
That is the signature of a mechanical fault at a fixed position — typically a bent lead screw or a dry patch on it, both of which bind at the same point in every rotation cycle. Turn the screw by hand with the power off and feel for the tight spot.
Can wet filament cause missing layers?
Yes. Absorbed moisture flashes to steam inside the nozzle, blowing voids into the melt so extrusion becomes intermittent. It usually announces itself with popping or crackling and a rough surface before the gaps appear.
Do I need to reprint, or can I salvage a print with missing layers?
Decorative parts are often acceptable. Anything structural is not: a missing layer is a plane of near-zero bond area, and the part will fail there under load. For functional prints, fix the cause and start again. Choosing an enclosed machine from the QIDI 3D printer range also removes one variable, since stable chamber conditions reduce the temperature swings behind several of these faults.
Commit to Proactive 3D Printer Care
Missing layers are a solvable problem, usually a minor mechanical fault or an extrusion stall. Knowing how to fix them matters less than not needing to: regular maintenance and dry, dimensionally consistent filament prevent most print failures before they start. Keep the hotend fan clean, keep filament sealed, check the lead screw occasionally, and this particular failure mostly stops happening.
- Symptom to Cause to Fix
- The Two Primary Causes of Missing Layers
- Cause 1: Extrusion Failure (The Filament Isn't Coming Out)
- Cause 2: Mechanical Z-Axis Failure (The Printer Isn't Moving Up)
- How to Fix Common Extrusion Problems
- 1. Check the Filament Spool and Path
- 2. Service the Hotend and Nozzle
- 3. Inspect the Extruder Mechanism
- 4. Evaluate the Filament Itself
- How to Fix Mechanical Z-Axis Problems
- 1. Fix Z-Axis Binding and Alignment
- 2. Tighten the Z-Axis Motor Coupler
- 3. Check Gantry Guides and Wheels
- Software Check: Slicer Settings
- A Final Troubleshooting Checklist
- FAQ
- What causes missing layers in 3D prints?
- Why is my 3D printer skipping layers?
- Is missing layers the same as layer shifting?
- Why do gaps appear at the same height on every print?
- Can wet filament cause missing layers?
- Do I need to reprint, or can I salvage a print with missing layers?
- Commit to Proactive 3D Printer Care
Recommended products






