

 Q2
Q2
 QIDI Box
 Plus 4
 Q1 Pro
 X-Max 3


How to expand your QIDI Plus4 3D Printer?

You can expand a QIDI Plus4 in three ways: print your own bolt-on parts that clip into the existing frame holes, fit QIDI's own replacement modules such as hardened nozzles and PEI plates, or add the QIDI Box for multi-color and active drying. Nothing here requires cutting or drilling the machine — every mod below attaches to a mounting point the printer already has.
When working with 3D printers, many users will want to add some useful features to the device. However, not all printers support such extensions.
In this case, QIDI Plus4 is not only an open source device, but also a powerful tool compatible with a wide range of hardware extensions and DIY modifications. Within a reasonable range, users can design and print out their own accessories to personalize the printer according to their needs and creativity.
Today, we will introduce you to two simple and practical expansion modules, which can not only significantly enhance the printing experience, but also add more fun to your 3D printing journey!
Further down I have priced the official QIDI parts worth fitting, listed what to order for a QIDI Box, and set out which Plus 5 features no Plus4 upgrade can add.
QIDI Plus4 Official Specifications
Before you design anything that bolts onto the machine, these are the numbers it is built around. All figures come from the official QIDI Plus 4 TechSpecs page.
| Specification | QIDI Plus4 |
| Build volume (W×D×H) | 305 × 305 × 280 mm |
| Printer dimensions | 505 × 487 × 550 mm |
| Max toolhead speed / acceleration | 600 mm/s / ≤20,000 mm/s² |
| Motion system | CoreXY, 9 mm 1.5GT belt; X/Y on 10 mm hardened hollow steel shafts; dual independent Z lead screws |
| Hotend / bed temperature | ≤370°C bimetal nozzle / ≤120°C |
| Chamber heating | 2nd-gen PTC heater, independent chamber heating up to 65°C |
| Extruder | Direct drive, hardened steel gears |
| Air handling | Chamber circulation fan with activated carbon filter |
| Multi-color | Compatible with QIDI Box |
| Screen / storage | 5-inch 800×480 touch screen / 32 GB eMMC + USB 2.0 |
| Rated power | 450 W + 400 W (chamber heating) |
Two of those numbers matter for modding. The 65°C chamber means any part you print to live inside the enclosure should not be PLA — it will soften. And the heat-dissipation holes on the rear panel are the mounting point both community mods below rely on.
Basic Expansion Module
1. Purge Bin
Module Description: When using QIDI Plus4 for filament replacement and nozzle wipes, excess waste is ejected from the excess chute. Without a suitable container to collect these wastes, they can be strewn all over the work area, detracting from tidiness and aesthetics. The Purge Bin is a tool designed to solve this problem. It catches the ejected waste steadily and effectively collects the waste generated during the printing process, helping to keep the work area tidy. In addition, the purge bin is easy to remove, making it a very practical accessory.
Model Display:

Installation Instructions:
- Align the two fixing clips on the back of the purge bin with the heat dissipation holes on the back of Plus4.
- Insert the clips into the heat dissipation holes to complete the installation.
Download: https://fpfdesigns.com/152_qidi_plus4_purge_bin.html (Thanks to the creator u/FunctionalPrintFriday for contributing this model, which is now available on YouTube!)
2. Top Glass Support
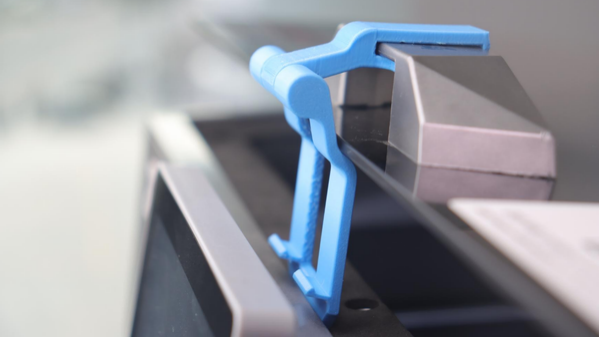
Module Description: When printing certain filaments with the QIDI Plus4, the glass top cover needs to be opened to ensure better ventilation and cooling. However, removing and reinstalling the top cover is often a tedious process. Since the top cover is made of glass, it is difficult to store it properly after removing it, and it can easily be bumped or broken. The Top Glass Support is designed to solve this problem. It allows users to print unsealed without removing the glass top. The bracket can lift the top cover and hold it securely in a semi-open position. What's more, the bracket can be permanently attached to the grip of the glass top, allowing the user to switch between closed and unsealed modes with a simple operation, which greatly enhances the convenience of operation.
Model Display:
 Installation Instructions:
- Assemble the two parts together and snap the clip into the handle of the glass top.

- Expand the bracket to support the glass cover.
- When closed printing is required, the bracket part can be turned upside down on the handle of the glass top cover.

Note: If you find that the downloaded "hine-1.stl" model is too large to be inserted into the top cover handle after printing, please reduce the print to 95% of the original size in the X-axis direction in the slicing software. Remember to turn off proportional scaling before reducing. As shown in the figure below:

Download: search Printables for model 1082410, "QIDI Plus 4 Top Glass Support" (thanks to the creator u/KarolT_2620410 for his contribution, this model was published on Printables).
Print Settings for These Two Mods
Both parts live on or near a printer that runs its chamber at up to 65°C, so material choice is not a matter of taste. PLA has a glass transition in the region of 60–65°C, which is exactly where the enclosure operates — a PLA bracket holding a glass lid will creep and sag over a summer of long ABS prints. Choose accordingly:
| Part | Material | Walls / infill | Why |
| Purge bin | ABS, ASA or PETG | 3 walls, 15–20% infill | Sits at the rear vent where hot air exits; catches hot purged filament |
| Purge bin clips | Same part, do not scale | — | Clip width is matched to the heat-dissipation hole pitch |
| Top glass support hinge | ABS or ASA | 4 walls, 25–30% infill | Carries the weight of a glass panel in a warm zone |
| Any part left outside the chamber | PLA is fine | 3 walls, 15% infill | No sustained heat load |
Print the hinge with the pivot axis vertical so the layer lines run across the load rather than along the split line — a hinge that fails always fails by delaminating between layers. If you are new to printing styrenics on this machine, the guide on succeeding with ABS filament covers the chamber and cooling settings, and what a temperature-controlled chamber actually does explains why the 65°C figure matters for mods that live inside it.
Upgrades QIDI Sells for the Plus4
Printed mods cover ergonomics and tidiness. The parts below change what the machine can do, and they are all listed under Plus 4 accessories. A Plus4 upgrade, the way I use the word here, is a part that drops into an existing mount or swaps a stock module one-for-one — no drilling, no firmware changes. Prices are main-store prices as I checked them in September 2026.
| Upgrade | Price | What it changes | When it is worth it |
| Bimetal nozzles (2 pcs) | $23.99 | Same type as the stock nozzle, sold in 0.2, 0.4, 0.6 and 0.8 mm | Spares, or trying a 0.6/0.8 mm bore for faster functional parts and 0.2 mm for fine detail |
| Tungsten carbide bimetal nozzle | $59.99 (1 pc) | Far higher wear resistance than brass; 0.4, 0.6 or 0.8 mm | Any regular use of carbon- or glass-filled filament |
| Second dual-sided PEI plate | $39.99 | Swap plates instead of waiting for one to cool | Back-to-back jobs; also a spare when a surface wears |
| Dual-sided smooth PEI plate | $59.99 | 0.188 mm smooth PEI on both faces of a 0.5 mm spring-steel sheet, for a glossy underside instead of the stock textured finish | Display parts, lids and anything where the bottom face shows |
| QIDI Cool Plate (PLUS4 version) | $29.99 | 305 × 305 mm low-temperature adhesive coating, rated to 120°C surface temperature | Mostly PLA and PETG work; QIDI advises against its own PLA Silk on this plate |
| Camera | $39.99 | Replacement for the stock camera — the Plus4 spec sheet already lists a low-framerate camera (up to 1080P) with timelapse | Only if yours has failed; do not buy it expecting a new feature |
| Activated charcoal filter refill | $5.99 | Restores the chamber filter's odour capture | It is a consumable — replace it, do not just clean it |
| Chamber heater + fan | $39.99 | Replacement module for the 2nd-gen PTC chamber heater | Repair part — worth knowing the price before you assume a dead heater means a dead printer |
| QIDI Box (Plus4 version) | $228 (list $299) | 4 spools per unit, up to 16 chained; 65°C drying while printing; tangle, clog and run-out detection | The single biggest capability change available to the machine |
My order of spending: the $23.99 nozzle two-pack first, then a second plate so I stop waiting on cool-down. The tungsten carbide nozzle only makes sense once filled filament is a regular job — the signs a nozzle needs replacing tell you when you have reached that point.
Adding a QIDI Box to a Plus4: What to Order
The QIDI Box is worth a note of its own because it is the one upgrade that adds a whole print mode rather than improving an existing one. Its BOX Hub and signal cable are machine-specific, so order the hub that matches your printer. Here is the Plus4 shopping list, taken from the variant names on QIDI's own product pages:
- One Box: order the QIDI Box in its Plus4 version. A Box bought on its own ships with the upgrade kit for the model you select, so nothing else is needed for a single unit.
- Two to four Boxes (up to 16 colors): add the QIDI Box Expansion Kit in its PLUS4 variant ($39.99). QIDI notes that the PLUS4 expansion kit does not fit the Q2, and the other variant (PLUS5/Q2/MAX4) is not for the Plus4.
- Replacement hub or cable: the Hub and Signal Cable set ($34.99) and the cable alone ($4.99) both come in a PLUS4 variant. The Plus4 cable has 4 signal pins; the Q2/Q2C cable has 5, so they are not interchangeable.
QIDI's QIDI Box wiki page spells it out: the Plus4 hub data cable differs from the Q2 and Max4 cable, do not mix them, and the Box unit itself is universal. The full specification, compatibility list and drying behaviour are in the QIDI Box guide, and the wiring walkthrough is in the QIDI Box connection tutorial.
Where the Plus4 Sits in the Plus Series Today
For context if you are researching the platform: the Plus 5 launched in August 2026 as the current model in the Plus series. The two machines share the same speed ceiling, the same 370°C hotend and the same 65°C chamber target, and differ mainly in build volume, guidance hardware and filtration. Published figures from both official spec pages:
| Specification | Plus4 | Plus 5 |
| Build volume | 305 × 305 × 280 mm | 320 × 320 × 300 mm |
| Max speed / acceleration | 600 mm/s / ≤20,000 mm/s² | 600 mm/s / ≤20,000 mm/s² |
| Chamber heating | 2nd gen, up to 65°C | 3rd gen independent chamber heating, up to 65°C |
| X axis | 10 mm hardened hollow steel shafts (X and Y) | High-hardness linear guide rail on X |
| Air filtration | Circulation fan with activated carbon filter | 3-in-1: G3 pre-filter + H12 HEPA + coconut shell activated carbon |
| Auto levelling | Hands-free automatic levelling | Hands-free, loadcell sensor integrated into the hotend |
| AI camera detection | Camera for monitoring and timelapse | Yes, AI camera detection |
| Connectivity | 2.4 GHz Wi-Fi, Ethernet, USB | 2.4/5 GHz Wi-Fi, Ethernet, USB |
Accessories do not cross over between the two. Plates, nozzles, hot ends and hub cables are model-specific, and Plus 5 parts are listed separately under Plus 5 accessories. The same is true one size up: if you are modding the larger machine instead, look under Max4 accessories rather than adapting Plus-series parts. Printed community mods are a different matter — they are dimensioned to a specific frame, so a Plus4 purge bin will not clip onto a different chassis without remodelling.
Upgrade Your Plus4 or Move to a Plus 5?
The Plus 5 is the current Plus-series model, and it shares the Plus4's 600 mm/s ceiling, 370°C hotend, 120°C bed and 65°C chamber target. So the honest question is not "is it faster" — it is not — but "does it have something built in that I cannot bolt onto my Plus4". This is how the two routes line up:
| What you want | Plus4 route | Plus 5 as shipped |
| Bigger prints | None — 305 × 305 × 280 mm is fixed | 320 × 320 × 300 mm, 18% more volume |
| Particle filtration | Activated carbon refill ($5.99); no HEPA stage is listed for the Plus4 | 3-in-1 filter: G3 pre-filter + H12 HEPA + coconut-shell activated carbon |
| Failure detection by camera | Stock camera for monitoring and timelapse; no AI detection on the spec sheet | AI camera detection, camera up to 1080P |
| Levelling | Stock hands-free levelling | Loadcell sensor integrated into the hotend |
| X-axis guidance | 10 mm hardened hollow steel shafts | High-hardness linear guide rail |
| Extruder cold-side cooling | The Polar Cooler ($199) is listed for PLUS5/MAX4/Q2 only | Polar Cooler supported as an option |
| Wi-Fi | 2.4 GHz | 2.4 / 5 GHz |
| Multi-color | QIDI Box, Plus4 version | QIDI Box, Plus5 version |
| Cost | $6–$60 per part, $228 for a Box | $749, or $899 for the Combo |
My rule of thumb: if what is slowing you down is on the parts list above — a worn nozzle, one plate, a tired carbon filter — spend $24 to $60 and keep printing on the Plus4. If it is build height, HEPA-grade filtration or wanting the machine to flag a failed print on its own, none of the Plus4 parts add those, and that is where the Plus 5 earns its $749.
One thing that does carry over is a QIDI Box. According to QIDI's Plus 5 FAQ, a Plus4 or Q2 Box works on the Plus 5 once you add the Hub and Signal Cable in its PLUS5/MAX4 variant ($34.99), and a multi-Box setup also takes the PLUS5/Q2/MAX4 expansion kit. Nozzles, plates and printed mods do not carry over. And if the real limit is size rather than features, the Max4 goes to 390 × 390 × 340 mm at $1,049. Everything else in the lineup is on the 3D printers page.
User Reviews
We have collected some user reviews of these extension modules. Here are some of the feedback:
Purge Bin
- u/mikko001 on YouTube: Thanks, printed it from ABS, came out nice and seems to fit :)
- u/robertclaude5961 on YouTube: Hi, thanks for this video, I will received my 4+ in few days (I hope) but I still start to watch tip and tric on it. The expuls of this bullet of filament is nice to know. I will create one also because access to the back will be not easy in my small house :) Have a nice day.
Top Glass Support

- lu/roman726: Fits nicely. Keeps temps down significantly. Thanks.

- u/PGTT2021: Printed in OVERTURE Super PLA Plus Rock solid Low Profile. Can be folded out of the way when not needed. Great design. Thank you.
FAQs About Plus4 Upgrades and Mods
What is the QIDI Plus4 build volume?
305 × 305 × 280 mm (W × D × H), per the official spec sheet. That is the figure to design against — a printed mod that has to fit inside the enclosure is limited by the enclosure, not by the plate.
Do I need to modify the printer to fit these mods?
No. Both featured parts clip into mounting points the machine already has: the purge bin into the rear heat-dissipation holes, the glass support onto the lid handle. No drilling, no adhesive, and both are reversible.
Why did my printed hinge not fit the glass handle?
The known fix is in the original instructions: scale the "hine-1.stl" part to 95% on the X axis only, with proportional scaling turned off first. Scaling all three axes will make the pivot bore undersized as well.
Which material should I use for Plus4 mods?
ABS, ASA or PETG for anything inside or against the enclosure, because the chamber runs up to 65°C and PLA softens near that temperature. PLA is fine for parts that sit outside the machine, such as spool holders or tool caddies on the bench.
Can I use Plus4 accessories on a Max4 or a Plus 5?
No. Nozzles, hot ends, build plates and QIDI Box hub cables are model-specific. Each machine has its own accessory collection, and printed community mods are dimensioned to one chassis. The QIDI Box unit itself is the exception: it is universal, and only the hub, signal cable and expansion kit change between printers.
What do I need to add a QIDI Box to my Plus4?
For one Box, just the QIDI Box in its Plus4 version ($228) — it ships with the matching upgrade kit. For two to four Boxes, add the PLUS4 variant of the expansion kit ($39.99). Do not use a Q2 or Max4 hub cable: the Plus4 cable has 4 signal pins, the Q2/Q2C cable has 5.
Should I upgrade my Plus4 or buy a Plus 5?
Upgrade the Plus4 if your limit is wear parts or plate turnaround — those cost $6 to $60 each. Look at the Plus 5 ($749) if you need 320 × 320 × 300 mm, an H12 HEPA filter stage or AI camera detection, because no Plus4 part adds them. Speed, hotend temperature and chamber target are the same on both.
Which upgrade should I do first?
If you print filled filaments, the hardened nozzle — a brass nozzle wears out quickly on carbon fiber. If you print long jobs, make sure the stock camera is connected and timelapse is on — it ships with the machine, so only buy the replacement if yours fails. If you want a new capability rather than a better version of an existing one, the QIDI Box is the only item on the list that qualifies. Routine nozzle care is covered in the nozzle maintenance guide.
Summary
We encourage every QIDI user to try to create new expansions and DIY modifications according to personal needs and interests. Start with the two printed modules above, choose a material that survives the chamber temperature, and move on to the hardware upgrades once you know which part of your workflow is actually slowing you down. If you have any interesting ideas or successful expansion projects, please share them in our 3D printing community — official firmware and documentation for the machine live on the QIDI wiki, the printer's motion and input-shaping behaviour follows the Klipper firmware it is built on, and hardware reviews such as the in-depth Plus 4 review give a fuller picture of the platform. Because of your participation and contribution, our community will be more harmonious and informative. Let us all make continuous progress and create more possibilities together!
- QIDI Plus4 Official Specifications
- Basic Expansion Module
- 1. Purge Bin
- 2. Top Glass Support
- Print Settings for These Two Mods
- Upgrades QIDI Sells for the Plus4
- Adding a QIDI Box to a Plus4: What to Order
- Where the Plus4 Sits in the Plus Series Today
- Upgrade Your Plus4 or Move to a Plus 5?
- User Reviews
- Purge Bin
- Top Glass Support
- FAQs About Plus4 Upgrades and Mods
- What is the QIDI Plus4 build volume?
- Do I need to modify the printer to fit these mods?
- Why did my printed hinge not fit the glass handle?
- Which material should I use for Plus4 mods?
- Can I use Plus4 accessories on a Max4 or a Plus 5?
- What do I need to add a QIDI Box to my Plus4?
- Should I upgrade my Plus4 or buy a Plus 5?
- Which upgrade should I do first?
- Summary
Recommended products






