

 Q2
Q2
 QIDI Box
 Plus 4
 Q1 Pro
 X-Max 3


How to Add Supports to Your Model?

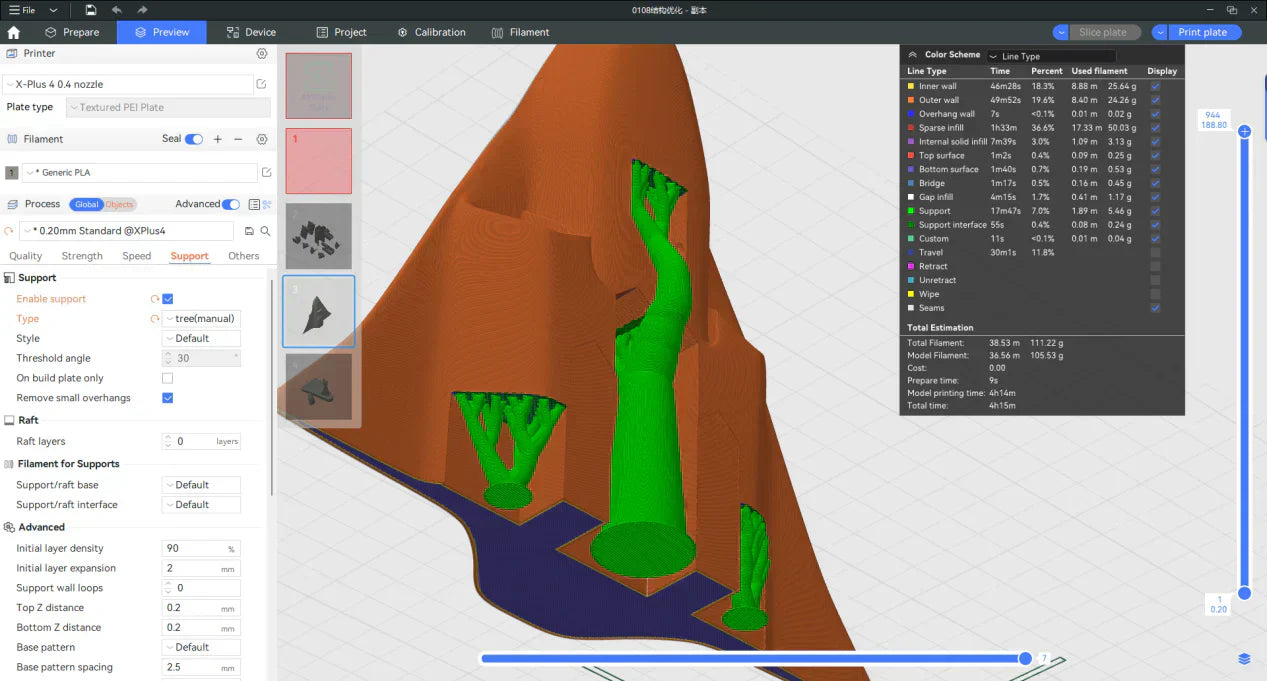
To add supports to a model in QIDI Studio, open the Support settings, tick "Enable support", and choose a type: Normal (auto) or Tree (auto) lets the slicer place supports for you, while Normal (manual) or Tree (manual) lets you paint them on yourself. Then slice the plate and check the preview before printing.
In 3D printing we often meet models with large overhanging parts. Without support underneath, those areas droop, curl or fail outright. This article covers the whole support workflow: automatic supports, painting supports by hand, blocking supports you do not want, the difference between normal and tree supports, and which parameters to adjust when something goes wrong. The software used throughout is QIDI Studio.
What support is, and when a model needs it
Support is temporary printed scaffolding that gives the nozzle something to build on where the model itself provides nothing. An FDM printer deposits each layer onto the one below it, so any region with air underneath has to be either bridged, self-supporting, or supported.
The practical rule of thumb: an overhang that leans less than roughly 45° away from vertical usually prints without support, because each layer still overlaps the one beneath it enough to hold. Past that, the overlap runs out and the extrusion has nothing to grip.
Before you enable anything, it is worth asking whether the model needs support at all. Three ways to avoid it entirely:
- Rotate the model. Many parts have an orientation with no meaningful overhang. Our model placement guide covers how orientation drives both support and strength.
- Cut the model. Splitting a part so each overhang becomes a flat face on the plate removes the support and the scarring it leaves — see how to cut a model in QIDI Studio.
- Let it bridge. A flat span between two anchored points prints fine without support up to a surprising length; supports under a short bridge usually make the surface worse, not better.
How to use automatic support
Automatic support is the efficient, convenient option. The slicer calculates the overhanging structures on the model and generates appropriate supports for them. Here is how to enable it correctly.
(1) Open the support settings interface and select "Enable support".
(2) Select "Tree (auto)" or "Normal (auto)" under support type. Which of the two suits your model is covered further down.

After completing the settings, click "Slice plate". The slicer generates supports based on the model structure, and in the slice preview you can clearly see the green tree support structure. These are printed alongside the model to hold up the overhanging parts.
Always look at the preview before you print. Automatic support is a guess made from geometry alone — it does not know which surfaces you care about, which is exactly why the manual tools below exist.
How to paint supports manually
Automatic support is convenient, but it sometimes generates redundant supports or misses the ones that matter, and both hurt the result. Painting supports by hand gives you precise control over where they are generated, which suits models that need fine adjustment.
First, open the support painting interface as shown below:
- Open the support settings interface and select "Enable support".
- Select "Tree (manual)" or "Normal (manual)" under support type.
- Click "Supports Painting" to enter the support painting interface.

In the support painting interface:
- Adjust "Highlight overhang areas" to make the overhanging regions easier to see.
- Use the "Circle" tool to brush over the model. The system generates supports for the brushed areas.
- Use the "Fill" tool and click an overhanging area to mark the whole region at once.

Take the model below as an example. It has four overhanging surfaces that need support painted on. Marks 1, 2 and 3 were made with the fill tool; mark 4 was brushed with the circle tool.

After slicing, the preview looks like this — supports have been generated on all the marked areas.

How to block support
Sometimes the supports the software generates are redundant. They raise the chance of a failed print, waste filament and can interfere with the model's function. The blocking function removes support from a specific region.
Select the model, right-click and choose "Add Support Blocker", then pick a blocker shape.

Adjust the blocker's position and size so it covers the area that does not need support.

After slicing, compared with the same model without blockers, the supports at that position are gone.


There is a counterpart worth knowing about: a support enforcer does the opposite, forcing support inside a region the slicer decided did not need any. Between the two you can override automatic support in both directions without switching to manual painting.
Normal support vs tree support
Normal support and tree support are the two common types, each with its own strengths.
Normal support has a simple structure and provides very reliable support for simple, large-area overhangs.
Tree support saves filament, is easier to remove and is friendlier to complex models, but may not hold up large flat overhangs as reliably.
Here is a comparison of the two:
Support Type |
Normal |
Tree |
Structure |
Grid, regularly arranged |
Branch, consisting of a trunk and branches |
Filament Use |
Relatively more |
More savings |
Application Scope |
Suitable for models with regular and large overhang areas |
Suitable for models with complex and small overhanging parts |
Support Removal |
Difficult to remove, easy to leave marks on the supported surface |
Easier to remove, reducing support surface damage |
Suitable for Complex Shapes |
Not very suitable for models with complex or detailed parts |
Great for models with complex shapes or requiring fine support |
Tree support:

Normal support:

How to adjust support parameters to solve common printing issues
Support parameters have a large effect on the final result. Adjusting the top Z distance, branch diameter and a few others fixes most of the usual complaints — support that will not come off, tree support that collapses mid-print, scarred surfaces.
Below, mark 1 is the top Z distance. The larger the value, the further the top of the support sits from the model surface and the easier it is to remove — but too large and the support stops doing its job.
Mark 2 is the branch diameter. A larger value makes the tree support thicker and stronger, which fixes prints that fail because a tall tree support toppled.

Below you can see the tree support becoming visibly thicker once the branch diameter is increased.

Support parameter reference
| Parameter | What it controls | Raise it when | Lower it when |
|---|---|---|---|
| Threshold angle | How steep an overhang has to be before support is generated | Overhangs are drooping and being missed | The slicer is supporting surfaces that print fine unsupported |
| Top Z distance | Gap between the top of the support and the model | Support fuses to the part and will not release | The supported surface sags or shows a rough underside |
| Bottom Z distance | Gap where support lands on a model surface below | Support marks the surface it stands on | Support slides or does not anchor |
| Support / object XY distance | Horizontal clearance between support walls and the part | Support is welded to vertical faces | Support walls peel away from the part and wobble |
| Base pattern & spacing | Density of normal support infill | Support is too flimsy to hold the overhang | You want less material and easier removal |
| Branch diameter (tree) | Thickness of each tree branch | Tree supports collapse or are knocked over mid-print | Removal is difficult and branches are over-built |
| Branch distance (tree) | Spacing between contact points | Overhang sags between branches | Contact scarring is excessive |
| Interface layers | Solid layers between the support and the model | The supported face comes out rough | The interface is too hard to separate |
| On build plate only | Whether support may stand on the model itself | — | Enable it to stop support landing on and marking the part |
| Don't support bridges | Skips support under bridged spans | — | Enable it when short bridges are being needlessly supported |
Change one parameter at a time and reslice. Changing three at once and getting a better print teaches you nothing about which one did it. If a setup works, save it as a process preset — our guide to custom filaments and processes covers how.
Removing supports without wrecking the part
Let the part cool fully before you touch the support. Warm plastic tears instead of snapping, and a torn interface leaves the roughest surface of all. Work from the outside in so each piece has somewhere to go, and use flush cutters rather than fingers on anything thin. Marks left behind are cosmetic and sand out — our notes on reducing visible layer lines apply to support scars too.
For models where no scar is acceptable, the real answer is a soluble interface: print the support interface layer in a different material, then dissolve it. That needs a multi-material setup such as the QIDI BOX, which lets you assign a separate filament to the support interface.
FAQ
How do I enable support generation?
Open the Support section of the process settings in QIDI Studio, tick "Enable support", and pick a type — Normal (auto), Tree (auto), Normal (manual) or Tree (manual). Then slice the plate. The auto types place support for you; the manual types wait for you to paint it on.
Should I use tree support or normal support?
Use tree support for organic, detailed models with lots of small overhangs — it uses less filament and comes off more cleanly. Use normal support for large, flat overhangs, where the grid structure holds the span more reliably than branches do.
At what angle does a 3D print need support?
As a working rule, an overhang that leans more than about 45° away from vertical will need support. The exact figure depends on the material, cooling and print speed, so treat 45° as the starting point and adjust the threshold angle from what you observe on your own parts.
Why is my support impossible to remove?
Usually the top Z distance is too small, so the support has effectively welded itself to the model. Increase it by one layer height and reslice. If the support is stuck to a vertical face rather than an underside, increase the support/object XY distance instead.
Why did my tree support fall over during printing?
Tall, thin branches carrying a large contact area are the usual cause. Increase the branch diameter so each branch is stronger, and reduce the branch distance so the load is shared across more contact points.
Can I print without supports at all?
Often, yes. Reorienting the model, cutting it into pieces that each sit flat, or redesigning steep overhangs as chamfers will remove the need entirely. Support is a workaround for orientation, and orientation is free.
Conclusion
That is the full support workflow: enable it, choose the right type, override it with painting, blockers and enforcers where the automatic result is wrong, then tune the top Z distance and branch settings until removal is clean. The same tools are on every machine in the QIDI lineup. For a wider look at overhangs and bridging, see our 3D printing support guide; PrusaSlicer's support documentation is a useful cross-reference since the whole slicer family shares this parameter set, and QIDI Studio's own source is public in the QIDI Studio repository. Background on how layer-by-layer deposition creates the overhang problem in the first place is on the fused filament fabrication page.
- What support is, and when a model needs it
- How to use automatic support
- How to paint supports manually
- How to block support
- Normal support vs tree support
- How to adjust support parameters to solve common printing issues
- Support parameter reference
- Removing supports without wrecking the part
- FAQ
- How do I enable support generation?
- Should I use tree support or normal support?
- At what angle does a 3D print need support?
- Why is my support impossible to remove?
- Why did my tree support fall over during printing?
- Can I print without supports at all?
- Conclusion
Recommended products






