 Q2
Q2


¿El patrón de capa es demasiado obvio? Aprenda un movimiento para lidiar fácilmente con él

Debido a la característica de apilamiento capa por capa de la tecnología FDM, es difícil evitar patrones de capas en la superficie del modelo, pero los patrones de capas "en forma de escalones" que se generan fácilmente en la superficie curva a menudo afectan la apariencia del modelo.
¿Cómo lograr una superficie de impresión relativamente lisa para el modelo? Además del pulido y esmerilado como método de procesamiento posterior a la impresión, también se pueden configurar parámetros como la altura de capa, el orden de las paredes y la velocidad de impresión en el software de corte. Este tutorial proporcionará una introducción detallada sobre cómo configurar la altura de capa en
Diagrama esquemático
Modelo inicial:

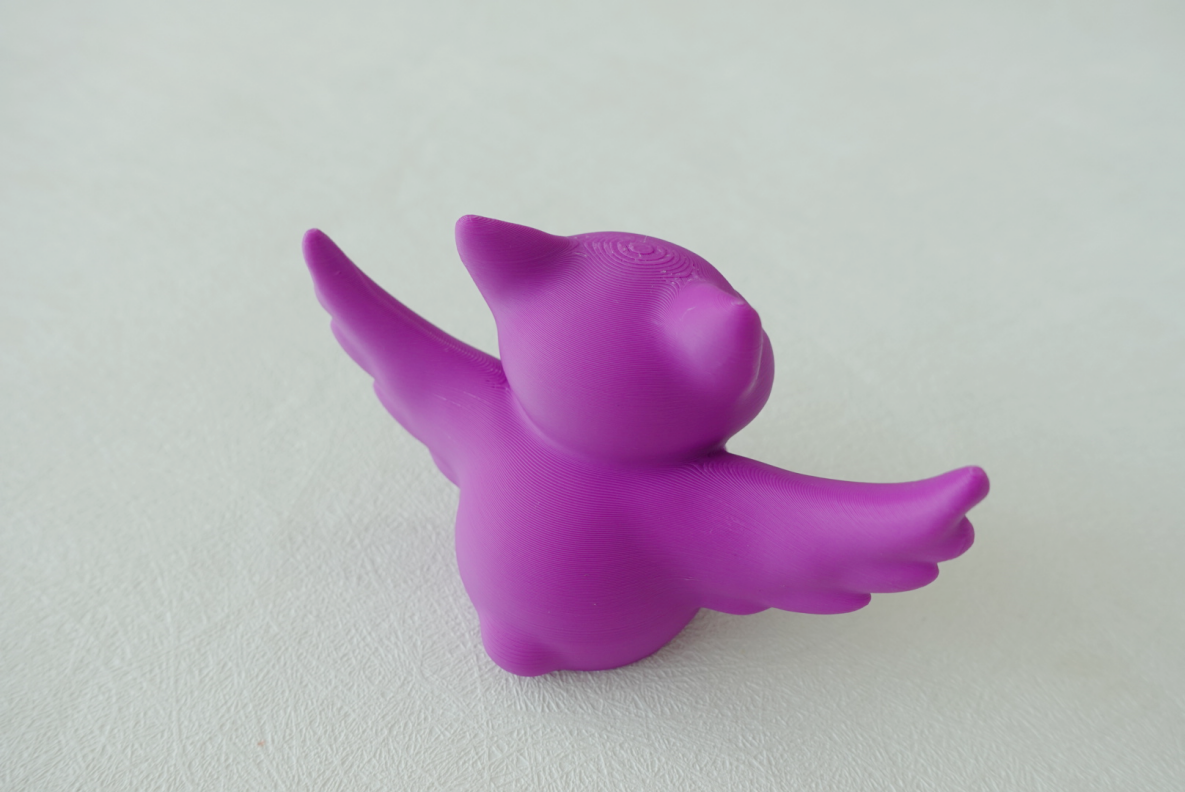
Modelo ajustado:

Si quieres conseguir un efecto similar puedes probar los siguientes métodos.
Introducción - Ajuste de la altura de la capa
Haga clic en la porción y podrá ver que la textura en la parte superior del modelo es más pesada de manera predeterminada.

En la columna de proceso, se pueden seleccionar diferentes alturas de capa para la impresión. El número que precede a cada parámetro representa el valor de la altura de capa. En teoría, cuanto menor sea la altura de capa, menor será la separación entre capas. Aquí, cambie "0,20 mm estándar" a "0,12 mm fino".


Al cortar de nuevo, se observa que la textura general del modelo, especialmente en la parte superior, se ha debilitado. En este punto, la superficie impresa del modelo será más lisa. Sin embargo, al reducir la altura de la capa, el tiempo de impresión requerido para el mismo modelo aumenta significativamente.


¿Cómo mejorar la calidad de impresión y garantizar la eficiencia? Puedes probar la función "Altura de capa variable".
Introducción - Altura de capa variable
Haga clic en el modelo y busque la opción "Altura de piso variable" en la barra de herramientas.

Haga clic en "Adaptativo" y "Suavizar" sucesivamente. Puede hacer clic en "Suavizar" varias veces para depurar, lo que suaviza la transición entre capas. Como se muestra en la figura a continuación, la parte verde del modelo representa la altura de la capa inferior, mientras que la parte naranja representa la altura de la capa superior.

Además de la depuración automática, también es posible configurar manualmente la posición donde se debe ajustar la altura de la capa. En el cuadro de vista previa a la derecha, arrastre el ratón para controlar la altura del suelo en diferentes posiciones. Haga clic izquierdo para reducir la altura de la capa; el modelo se mostrará en verde; haga clic derecho para aumentarla; el modelo se mostrará en naranja.

Haga clic en la porción y podrá ver que la textura en la parte superior del modelo ha mejorado significativamente en comparación con antes de la modificación, mientras que el tiempo de impresión solo ha aumentado ligeramente.


Conclusión
Ajustando la altura de la capa de impresión en


