 Q2
Q2
 QIDI Box
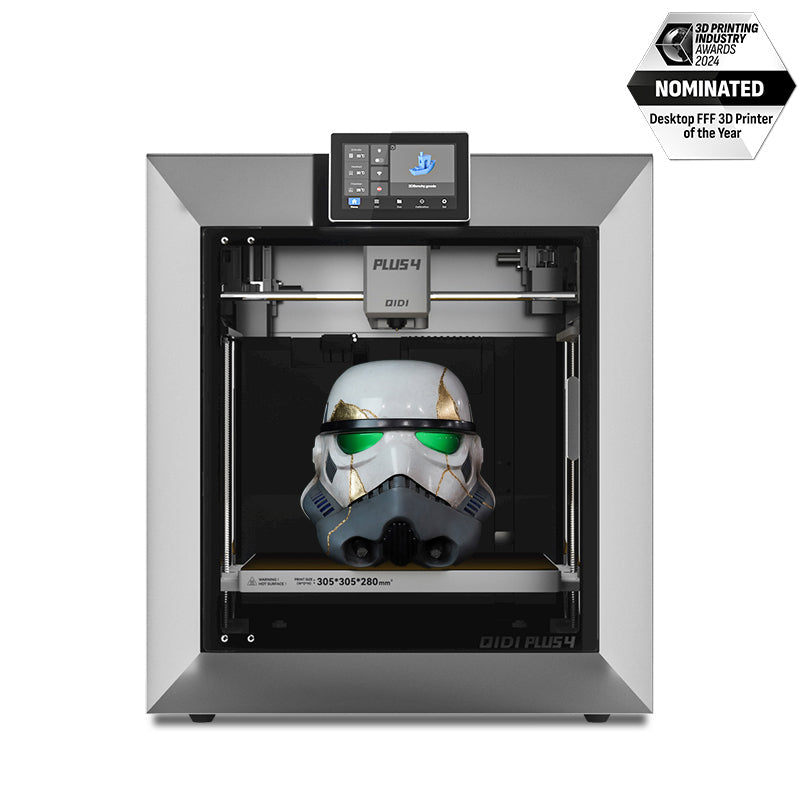
 Plus 4
 Q1 Pro
 X-Max 3


The Ultimate Guide to 3D Printing a Cosplay Helmet

Ever wonder how cosplayers get those perfect, screen-accurate helmets? The kind that look so good you’d think they were official movie props? For a long time, that level of quality required serious skill and expensive materials. But today, 3D printing has made it possible for anyone with a bit of patience to create their own incredible gear.
This guide is here to show you exactly how it’s done. We'll cover everything from picking the right tools to getting that professional, painted finish. Let's get started on turning that cool idea into something you can actually wear.

What Do You Need for Cosplay 3D Printing?
Getting organized before you start is the secret to a less stressful project. Think of this as your shopping list. With this gear on hand, you’ll be ready to tackle a helmet print with confidence.
A Capable 3D Printer
For a project this big, your choice of 3D printer matters. You don't need the most expensive model, but it should have a few key features that make printing large objects much easier.
- Large Build Volume: Try to get a printer with a big build area (300x300x300mm is a great target). This lets you print most helmets in one go, which means less time spent gluing and sanding parts together.
- Enclosed 3D Printer: A printer with a fully enclosed build chamber is a game-changer for materials like ABS. This feature keeps the heat in, creating a stable,warm environment that helps prevent the corners of your print from lifting up and warping.
- A Reliable Heated Bed: This is a standard feature now, and for good reason. A heated bed is crucial for getting that all-important first layer to stick down properly, setting you up for a successful print.
The Right Filament
Filament is the plastic spool that your printer uses to build your helmet. The type you choose affects the final strength, weight, and how easy it is to work with. Here’s a simple breakdown of the best options for cosplay:
| Filament | Best For | Pros | Cons |
| PLA+ | Beginners & display pieces. | Super easy to print, not fussy about temperatures. | A bit brittle, can soften or deform in a hot car. |
| PETG | Props that need to be tough and a bit flexible. | Strong and durable, handles heat better than PLA+. | Can leave little plastic strings on the print. |
| ABS | Armor that needs to be very strong and sandable. | Very tough, can be sanded to a glass-smooth finish. | Needs an enclosure to print well, has a plastic smell. |
Digital & Physical Tools
Finally, grab these supplies to round out your kit.
- 3D Model Files (.STL/.OBJ): You can find thousands of free files on sites like Thingiverse or buy incredible, detailed models from designers on Etsy.
- Slicing Software: A program like Cura or PrusaSlicer "slices" your model into layers and creates the instruction file for your 3D printer.
- Finishing Supplies: You’ll need sandpaper (in 120, 240, and 400 grits), a strong glue (like 2-part epoxy), filler primer from an auto shop, and your paints of choice.
How to Print a Cosplay Helmet in 3 Easy Steps
Alright, you’ve got your gear. Now it’s time to actually print this thing. Be prepared: a helmet is a long print, so the name of the game is patience.

Step 1: Model Preparation & Slicing
Your slicer software is where you dial in the recipe for your print. These settings are a great starting point for a cosplay helmet:
- Layer Height: 0.16mm to 0.2mm is the sweet spot. It gives you good detail without taking forever to print.
- Infill: You don’t need a solid helmet. An infill of 15-20% will make it strong enough for cosplay use without being too heavy.
- Supports: Helmets need support structures to print correctly. If you have the option, choose "Tree" supports. They work great and are usually much easier to break off later.
- Adhesion: Always use a "brim." This adds a flat, single-layer outline attached to your helmet's base, which really helps it stay stuck to the printer bed.
Step 2: Ensuring a Perfect First Layer
Seriously, the first 10 minutes of a 30-hour print are the most important. Make sure your printer bed is level. When you start the print, watch that first layer. You’re looking for clean, slightly squished lines of plastic. If that first layer is perfect, you can relax a little.
Step 3: Printing and Troubleshooting
For the next day or two, the printer will be doing its thing. You don’t have to stare at it the whole time, but it’s a good idea to check in every few hours. Just make sure it’s still printing smoothly and everything looks okay.
How to Smooth and Paint Your 3D Printed Helmet
What comes off the printer is just the raw form. The steps you take now are what will make your helmet look like a professional prop.
Step 1: Cleanup & Assembly
Once the print is done and cool, carefully remove it. The first task is breaking off all those support structures. Take your time and use small pliers so you don’t damage the surface. If you printed the helmet in pieces, use 2-part epoxy to glue them together for a rock-solid bond.
Step 2: Sanding & Priming
This part takes the most work, but it’s what makes the biggest difference. Your goal is to make all those tiny, horizontal print lines disappear.
- Rough Sanding: Start with 120-grit sandpaper. This will feel rough, but it's effective at knocking down the most obvious lines.
- Filler Primer: In a ventilated space, spray the helmet with a couple of light coats of filler primer. This stuff is thick and fills in the smaller imperfections.
- Fine Sanding: After the primer dries, sand it again with 240-grit paper. You’ll feel it starting to get really smooth.
- Repeat as Needed: For a truly flawless finish, repeat the prime-and-sand step with even finer sandpaper (like 400-grit) until you can’t see or feel any lines.
Step 3: Painting & Finishing
You're at the final step! Always start with one last coat of regular primer. It helps the paint stick and gives you a nice, even color base. Spray paints are great for the main colors, and small acrylic paints and brushes are perfect for adding details, weathering, and battle damage. To finish it off, spray the whole thing with a matte or gloss clear coat to protect your hard work.
Your Cosplay Legend Begins: Final Thoughts & Next Steps
Holding that finished helmet in your hands is an incredible feeling. You took a digital file and turned it into a real, solid object. It took some time and effort, but you now have a piece of gear that’s totally custom and made by you.
Don't stop here. The best way to get better is to share what you've made and see what other people are creating. Check out online communities like the r/3DprintingCosplay subreddit. You’ll find great advice and get inspired for your next project. Go make something awesome.
FAQs About 3D Printing Cosplay Helmets
Q1. How can I ensure that the model of the helmet suits my head?
Adjust the size of the helmet with the help of free software such as Meshmixer or Armorsmith Designer prior to printing it. Take the circumference around your head from ear to ear and around once. Apply these readings to modify the shape in 3D so that there is space for padding and comfort within, about 1-2 cm.
Q2. How do I install lights on a helmet with no visor and still be able to see?
To look through it, place clear colored acrylic or single-sided clear vinyl behind tiny holes or slits in the model. To incorporate lights, design areas for the wire and battery pack within the model prior to printing. Employ tiny LED strips to keep it lightweight and stable.
Q3. My finished helmet feels a bit fragile. How can I reinforce it?
You can reinforce the helmet to make it more sturdy by introducing support from the interior. Apply a sheet of fiberglass cloth coated with epoxy or Bondo resin on the interior surface. You now have a hard shell that is rugged but maintains the outside appearance you desire.
Q4. Is it safe to hold up a print that requires over 40 hours overnight?
New 3D printers are good with short breaks. When the break is for over an hour, the nozzle may cool down and impart a tiny mark upon resuming printing. Nonetheless, it's better to allow the print to complete without interrupting it. It is better to be left alone than not to print at al,l but it is safe in general.
Q5. Will I have to sand much in order to obtain a smooth finish?
No, resin coating is excellent. A self-leveling resin (such as XTC-3D) makes layer lines smooth and reduces sanding time considerably. It's a faster process, but it may obscure fine details if you make the coat too heavy. It's a trade-off between speed and preserving fine details.
- What Do You Need for Cosplay 3D Printing?
- A Capable 3D Printer
- The Right Filament
- Digital & Physical Tools
- How to Print a Cosplay Helmet in 3 Easy Steps
- Step 1: Model Preparation & Slicing
- Step 2: Ensuring a Perfect First Layer
- Step 3: Printing and Troubleshooting
- How to Smooth and Paint Your 3D Printed Helmet
- Step 1: Cleanup & Assembly
- Step 2: Sanding & Priming
- Step 3: Painting & Finishing
- Your Cosplay Legend Begins: Final Thoughts & Next Steps
- FAQs About 3D Printing Cosplay Helmets
- Q1. How can I ensure that the model of the helmet suits my head?
- Q2. How do I install lights on a helmet with no visor and still be able to see?
- Q3. My finished helmet feels a bit fragile. How can I reinforce it?
- Q4. Is it safe to hold up a print that requires over 40 hours overnight?
- Q5. Will I have to sand much in order to obtain a smooth finish?
Recommended products


