

 Q2
Q2
 QIDI Box
 Plus 4
 Q1 Pro
 X-Max 3


Guide to Auto Bed Leveling in 3D Printing

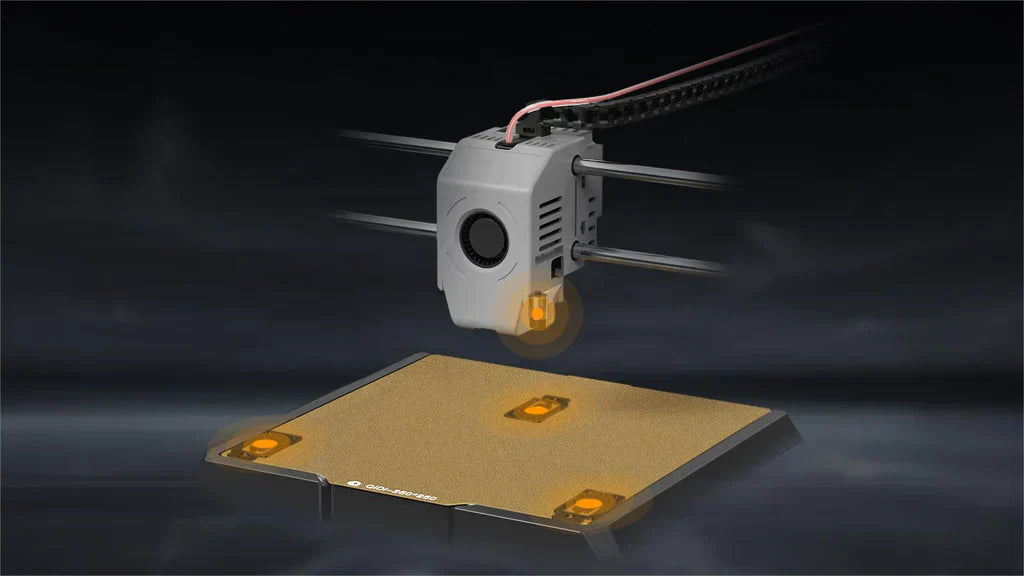
Automatic bed leveling is a system that uses a sensor to probe the print surface at multiple points, build a digital height map of it, and adjust the Z axis in real time so the nozzle stays the same distance from the bed everywhere. It replaces manual corner adjustment and is the single biggest reason modern printers succeed on the first layer.
What Bed Leveling Actually Means
Bed leveling is the process of making the build platform parallel to the path the print head travels, so the gap between the nozzle and the surface is constant across the whole build area. The word "level" is misleading — the bed does not need to be level with the ground. It needs to be parallel with the motion system.
Automatic bed leveling, usually abbreviated ABL, does not physically move the bed. It measures the bed's real shape and then compensates for it in software while printing. That distinction explains most of what follows.
Why Manual Bed Leveling Fails So Often
Manual bed leveling means physically adjusting the print surface with knobs or thumbscrews until it sits parallel to the nozzle's travel. Most people know it as the "four-corner dance," and it has three built-in problems.
- Endless adjustment. You move the nozzle to each corner in turn and adjust a screw underneath.
- A subjective test. The standard method is sliding a sheet of paper between nozzle and bed and feeling for a "slight drag." That feeling is not consistent between two people, or even between two attempts by the same person.
- A loop that does not close. Adjusting one corner changes the others, so you repeat the whole cycle several times to converge.
An error smaller than the thickness of that sheet of paper is enough to cause prints that will not stick, warping and curling at the corners, or a print that detaches and turns into a tangle of filament. Manual leveling is the number one place beginners get stuck.
How Automatic Bed Leveling Works
ABL runs in three stages, and understanding them makes troubleshooting much easier.
Stage 1: The Scan
Before the print begins, the printer runs a calibration routine. A probe attached to the print head moves across the bed and takes a height reading at each point of a grid — commonly 16 points, 36 points, or on larger machines an 81-point 9 × 9 mesh. More points means a more faithful map, at the cost of a longer probing cycle.
Stage 2: The Map
Each reading records the exact height at one coordinate. From that data the firmware builds a bed mesh: a topographical map of the surface, including every microscopic hill and valley. Most printers will display this mesh as a grid or a 3D plot.
Stage 3: The Compensation
This is the part people misunderstand. The system never straightens the bed. It uses the map to move the Z axis up and down continuously during the first layers, tracking the contours of the surface so the nozzle keeps a constant gap. The physical bed stays exactly as crooked as it was; the nozzle simply follows it.
Common Probe Types
| Sensor type | How it detects the surface | Practical note |
|---|---|---|
| Physical touch probe | A retractable pin deploys and touches the bed | Works on any surface material; the pin is a moving part that can wear |
| Inductive probe | Senses the metal plate beneath the print surface | No contact, fast, but sensitive to bed temperature drift |
| Strain gauge / nozzle touch | Measures force as the nozzle itself presses the bed | Measures from the true nozzle tip, so it can set Z-offset automatically |
| Capacitive probe | Detects change in capacitance near the surface | Affected by surface material and humidity |
Many current machines combine two of these. The QIDI Plus 4, for example, uses an inductive sensor for the mesh and a sensor inside the print head that touches the nozzle to the bed to set the Z-offset without any paper test at all.
Manual Versus Automatic: What Actually Differs
| Factor | Manual leveling | Automatic bed leveling |
|---|---|---|
| Time per session | 10–15 minutes, longer for beginners | Roughly one minute, unattended |
| Measurement points | 4 corners plus centre | 16, 36, or 81 points across the plate |
| Repeatability | Varies with the operator's feel for the paper drag | Data-driven, identical result each run |
| Handles a bowed or dished bed | No — only tilt can be corrected | Yes, within the range the mesh can compensate |
| Handles thermal expansion | Only if you re-level hot | Yes, if the mesh is probed at printing temperature |
| Needed before every print | Frequently, in practice | No; periodic re-checks are enough |
| Suitability for high-speed printing | Marginal | Required above roughly 500 mm/s |
What Goes Wrong When the Bed Is Not Level
Adhesion Failures
An unlevel bed lets parts of the print detach from the surface. That shows up as warping, where the edges lift, or as complete detachment mid-print.
Dimensional Errors
When the nozzle-to-bed distance varies across the plate, layer thickness varies with it. Some regions come out thicker than intended, parts of the model are distorted, and the bottom surface finish is inconsistent.
Hardware Damage
If the nozzle sits too close in one region, material backs up and can cause a nozzle jam. In the worst case the nozzle scrapes or gouges the build surface. Both are avoidable and both are expensive.
Why ABL Matters More at High Speed
On a machine running at 500 mm/s or more, a first-layer error that a slow printer would survive escalates within seconds. There simply is not enough time for a partially attached line to settle before the next one lands on it. High-speed printing depends on a foundation that is right on the first attempt, which is why every fast machine ships with automatic leveling.
The same logic applies to build area. The larger the plate, the more surface variation there is to compensate for, and the less a four-point manual adjustment can do about it. That is why large-format machines such as the Plus 4 and the Max4 use dense probe grids rather than a handful of points. You can compare probing and calibration features across the range on the 3D printer collection page.
Setting Up Automatic Bed Leveling
Most current printers arrive with ABL built in and need nothing more than running the routine. If you are adding it to an older machine, you need a compatible control board, the right probe, basic hand tools, and firmware that supports the feature.
Step 1: Confirm Your Printer Supports a Probe
Check the manual or manufacturer's page for probe support. If it is not supported natively, you will need an upgrade kit and a firmware build that includes leveling — see Marlin's auto bed leveling documentation for what the firmware side involves.
Step 2: Mount the Probe
Power the printer off first. Fit the probe near the print head with the supplied bracket, connect its wiring to the correct header on the control board, and check every connection before powering back on.
Step 3: Position It Correctly
The probe must be able to reach every part of the plate that will be printed on, without colliding with anything as the head moves. If the height is adjustable, set it so the probe triggers before the nozzle would contact the bed.
Step 4: Configure the Firmware
Flash firmware with leveling enabled, turn the feature on, and enter the probe's X, Y, and Z offsets relative to the nozzle. These offsets are the most common source of setup problems — a wrong X or Y value makes the printer probe the wrong coordinates, and a wrong Z value ruins the first layer everywhere at once. Save and restart, then run the G29 leveling command and inspect the mesh it produces.
Z-Offset: The Step After Leveling
Newcomers often assume the job is done once the mesh is built. It is not. ABL corrects the tilt and unevenness of the bed, but it has no idea how much first-layer squish you want. Z-offset is the global adjustment that sets that.
Set it once, while a first-layer test pattern is actually printing. Use the on-screen menu to nudge the value in small increments — 0.01 mm steps are typical — until the extruded lines lay down flat, touch their neighbours, and show no gaps. Then save it. You will rarely need to change it again unless you swap the nozzle or the build plate.
| What you see on the first layer | What it means | Adjustment |
|---|---|---|
| Round, separate strands that lift easily | Nozzle too far from the bed | Lower Z-offset in 0.02 mm steps |
| Transparent, scratched, or ridged surface | Nozzle too close, flow restricted | Raise Z-offset in 0.02 mm steps |
| Flat lines fused together, uniform sheen | Correct | Save the value |
| Good at the centre, poor at the edges | Mesh is stale or probe offsets are wrong | Re-run leveling; verify probe X/Y offsets |
Calibrating, Testing, and Troubleshooting
After installing or re-running a leveling system, verify it rather than assuming it worked.
- Get the bed roughly level first. ABL compensates for small deviations. If the bed is badly tilted, correct it mechanically before relying on software.
- Read the mesh. Most printers display the measured heights. Look for extreme outliers, which usually indicate a loose plate, debris under the surface, or a probe that mis-triggered.
- Print a full-plate test. A single-layer square covering most of the bed is the fastest way to see whether compensation is working. It should peel off in one piece with no separated lines.
- Probe at temperature. Metal expands. A mesh built on a cold bed will not match a bed at 100 °C.
- Keep the surface clean. Residue changes the effective height and confuses contact probes. See the guide to proper bed cleaning.
If the first layer is still inconsistent after all of this, the problem has moved elsewhere — work through first-layer problems and fixes or the broader printer calibration guide.
What Automatic Bed Leveling Cannot Do
ABL is a software compensation tool, not a repair. It handles the microscopic imperfections of a normal print surface. It cannot fix a severely warped plate, a loose bed carriage, a bent Z axis, or a gantry that is not square. If the mesh shows several tenths of a millimetre of deviation, the answer is mechanical, not a denser probe grid.
It also cannot compensate for a dirty plate, wet filament, or the wrong bed temperature. Those produce adhesion failures that look exactly like a leveling problem and are not one.
FAQs About Automatic Bed Leveling
Do I need to level the bed before every print?
No. Once ABL is set up correctly, the saved mesh covers normal printing. Re-run it after changing the nozzle or build plate, after moving the machine, or if first layers start drifting. Some printers probe automatically at the start of every job, which costs about a minute.
How does automatic bed leveling work in simple terms?
A sensor near the print head touches or senses the bed at many points, the firmware stores those heights as a mesh, and during printing the Z motor raises and lowers the nozzle to follow that mesh. The bed itself never moves.
Is automatic bed leveling worth it?
Yes, for almost everyone. It removes the most common cause of failed prints, saves 10–15 minutes per session compared with manual leveling, delivers the same result every run, and is effectively mandatory on large plates and high-speed machines.
What is the difference between bed leveling and Z-offset?
Bed leveling corrects the shape and tilt of the surface. Z-offset sets how close the nozzle sits to that surface overall. You need both: a perfect mesh with a wrong Z-offset still gives you a bad first layer everywhere.
How many probe points do I need?
For a small plate, 16 points is usually enough. Plates around 300 mm square benefit from 36 to 81 points, because there is more surface variation to capture. Beyond that, extra points add probing time without much accuracy gain.
Can automatic bed leveling fix a warped bed?
Only partially. A mesh can compensate for a gentle bow within the firmware's correction range. A genuinely warped or damaged plate should be replaced — a thicker aluminium bed stays flatter as it heats, which is why higher-end machines use 6 mm plates rather than 3 mm.
Why is my first layer still bad after auto leveling?
The three usual reasons are a wrong Z-offset, a mesh probed at the wrong temperature, and a dirty or worn build surface. Check them in that order before assuming the sensor has failed.
Which QIDI printers have automatic bed leveling?
All current QIDI machines do, including the entry-level Q2C and the Q2. Larger models use denser probe grids, and several also set the Z-offset automatically by touching the nozzle to the plate, which removes the paper test entirely.
- What Bed Leveling Actually Means
- Why Manual Bed Leveling Fails So Often
- How Automatic Bed Leveling Works
- Stage 1: The Scan
- Stage 2: The Map
- Stage 3: The Compensation
- Common Probe Types
- Manual Versus Automatic: What Actually Differs
- What Goes Wrong When the Bed Is Not Level
- Adhesion Failures
- Dimensional Errors
- Hardware Damage
- Why ABL Matters More at High Speed
- Setting Up Automatic Bed Leveling
- Step 1: Confirm Your Printer Supports a Probe
- Step 2: Mount the Probe
- Step 3: Position It Correctly
- Step 4: Configure the Firmware
- Z-Offset: The Step After Leveling
- Calibrating, Testing, and Troubleshooting
- What Automatic Bed Leveling Cannot Do
- FAQs About Automatic Bed Leveling
- Do I need to level the bed before every print?
- How does automatic bed leveling work in simple terms?
- Is automatic bed leveling worth it?
- What is the difference between bed leveling and Z-offset?
- How many probe points do I need?
- Can automatic bed leveling fix a warped bed?
- Why is my first layer still bad after auto leveling?
- Which QIDI printers have automatic bed leveling?
Recommended products






