How to Optimize Model Seams in QIDI Studio?

Share this post
Improve 3D Printing Quality with Seam Optimization

In addition to the spiral vase mode, each outer circle path that the nozzle passes through during 3D printing must have a starting point and an end point, which will form a seam on the side of the object and greatly affects the appearance (as shown in the figure below).

A 3D printed colorful gourd has seams on the sides, which greatly affects the appearance.

In order to improve the overall texture and printing accuracy of the model, QIDI Studio provides a special seam drawing tool and seam position setting to help users hide the seam position during the slicing process, thereby obtaining a more refined printing effect.

Example

Before using the seam painting tool, we can see that the seam is located on the front of the mask, which greatly affects the appearance.

Before using the seam painting tool, the seams from the 3D printer were on the front of the mask, which was very unsightly.

After painting the seam, we can see that the seam is located on the back of the mask and does not affect the performance.

The same 3D printed mask after using the seam painting tool, with the seam now located on the back side, showing an improved appearance.

The model effect shown in the figure above is achieved by painting seams. If you want to achieve a similar effect, you can follow the steps below.

Steps

1.Select the model, click on “Seam Painting” in the menu, and enter the seam painting interface.

Select the model, click on “Seam Painting” in the menu, and enter the seam painting interface.

2.Paint the seam at the appropriate position of the model.

Paint the seam at the appropriate position of the model.

3.Click on the “Slice plate”and you can find the seam appears where we painted it.

Seam Position Settings

There are four types of seam positions to choose from in QIDI Studio: Nearest, Aligned, Rear and Random. They can continue to optimize the seam representation.

For the working principles and expressions of the algorithms related to these four seam modes, please refer to QIDI Wiki:

https://wiki.qidi3d.com/en/software/qidi-slicer/print-settings/seam-position
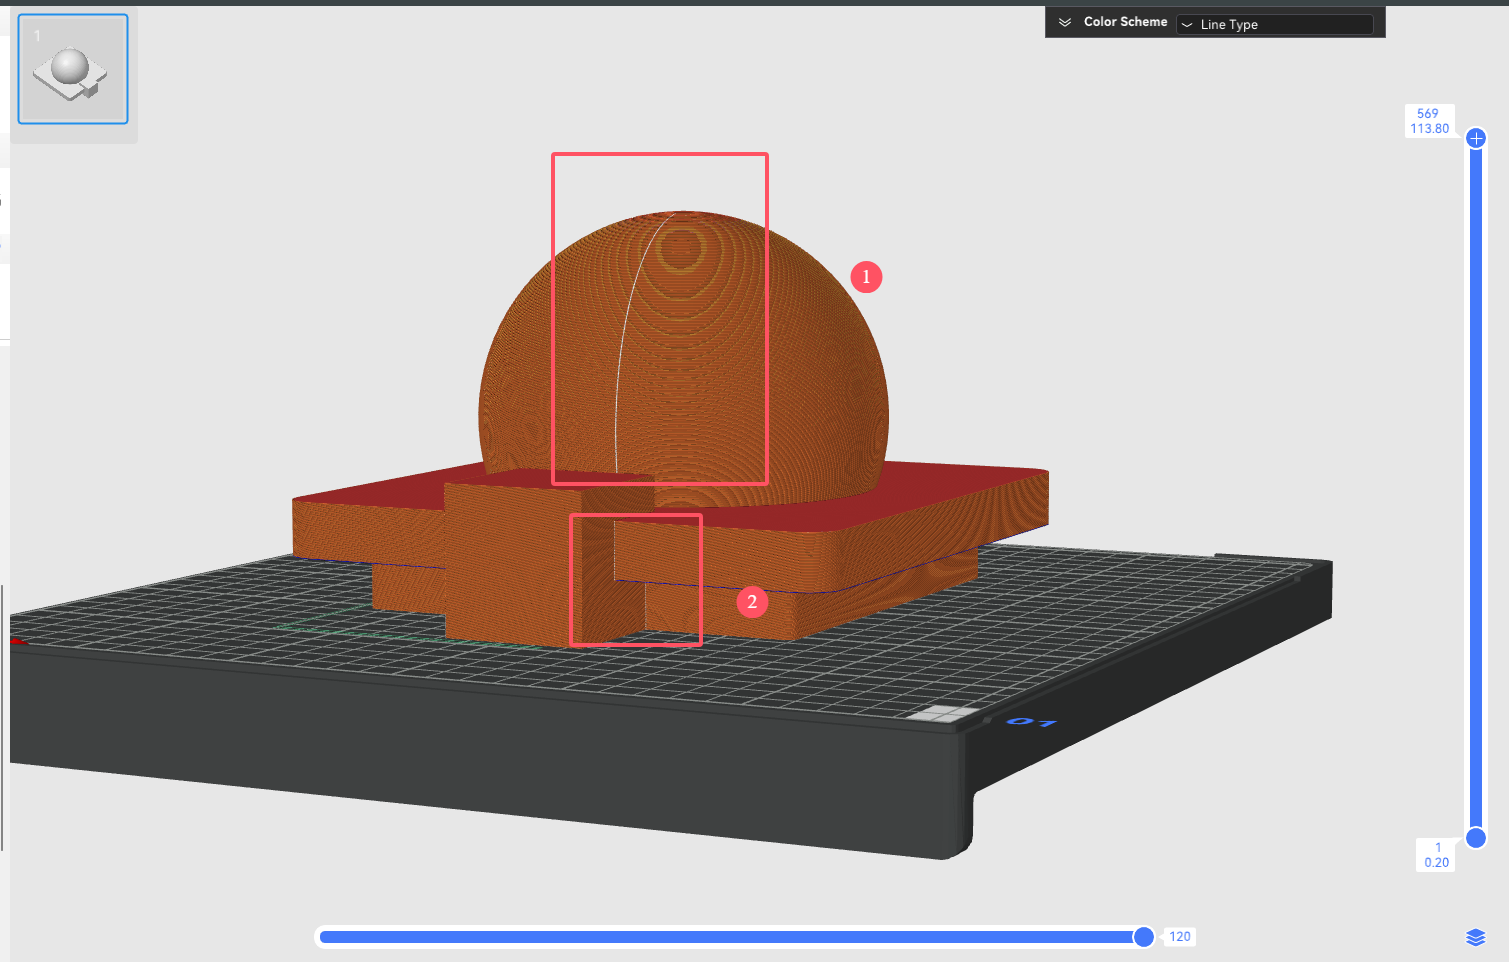
Example of Optimizing Seam Position:

Steps to optimize model seams in QIDI Studio

Problem Analysis: As shown in the figure above, after using the “Align” seam mode, the seams of this model are mainly distributed in parts 1 and 2.

Part 1: The seam is located on the front of the model, which affects the performance and needs to be optimized to the back of it.

Part 2: The seams are already hidden on the concave vertices and perform well, sp no optimization is needed.

Steps to optimize model seams in QIDI Studio

Optimization steps: Use the seam painting tool to paint the seam on the back of the ball, and then slice it. We can find that the seams on the front of the model disappeared.

Steps to optimize model seams in QIDI Studio

In the end

Through the above tutorials and introductions, you can effectively optimize the model seams and appearance in QIDI Studio. Seam optimization can also enhance the stability of the overall structure, providing strong support for you to create higher quality 3D printed works.

Read More

How to Add Modifiers in QIDI Studio?

How to Add Negative Parts in QIDI Studio?

How to Create Custom Filaments or New Processes in QIDI Studio?

Table of contents

Часто задаваемые вопросы

Найдите ответы на самые актуальные вопросы о наших 3D-печатных машинах и услугах.

3D-печать — это процесс создания трехмерных объектов из цифрового файла. Он включает в себя наложение слоев материалов, таких как пластик или металл, для создания конечного продукта. Эта инновационная технология позволяет производить кастомизацию и быстрое прототипирование.

Мы предлагаем быстрые и надежные варианты доставки для всех наших продуктов. После размещения заказа вы получите номер отслеживания, чтобы отслеживать его ход. Время доставки может варьироваться в зависимости от вашего местоположения.

Наши 3D-принтеры поставляются с годовой гарантией, покрывающей производственные дефекты. Доступны варианты расширенной гарантии. Более подробную информацию см. в нашей гарантийной политике.

Да, у нас есть политика возврата без проблем. Если вы не удовлетворены покупкой, вы можете вернуть ее в течение 30 дней для полного возврата денег. Пожалуйста, убедитесь, что продукт находится в своем первоначальном состоянии.

Конечно! Наша преданная своему делу команда поддержки готова помочь вам с любыми вопросами или проблемами. Вы можете связаться с нами по электронной почте или по телефону для получения оперативной помощи. У нас также есть комплексный онлайн-центр ресурсов.

Все еще есть вопросы?

Мы здесь, чтобы помочь вам с любыми вопросами.