How to Optimize Model Seams in QIDI Studio?

Share this post
Improve 3D Printing Quality with Seam Optimization

In addition to the spiral vase mode, each outer circle path that the nozzle passes through during 3D printing must have a starting point and an end point, which will form a seam on the side of the object and greatly affects the appearance (as shown in the figure below).

A 3D printed colorful gourd has seams on the sides, which greatly affects the appearance.

In order to improve the overall texture and printing accuracy of the model, QIDI Studio provides a special seam drawing tool and seam position setting to help users hide the seam position during the slicing process, thereby obtaining a more refined printing effect.

Example

Before using the seam painting tool, we can see that the seam is located on the front of the mask, which greatly affects the appearance.

Before using the seam painting tool, the seams from the 3D printer were on the front of the mask, which was very unsightly.

After painting the seam, we can see that the seam is located on the back of the mask and does not affect the performance.

The same 3D printed mask after using the seam painting tool, with the seam now located on the back side, showing an improved appearance.

The model effect shown in the figure above is achieved by painting seams. If you want to achieve a similar effect, you can follow the steps below.

Steps

1.Select the model, click on “Seam Painting” in the menu, and enter the seam painting interface.

Select the model, click on “Seam Painting” in the menu, and enter the seam painting interface.

2.Paint the seam at the appropriate position of the model.

Paint the seam at the appropriate position of the model.

3.Click on the “Slice plate”and you can find the seam appears where we painted it.

Seam Position Settings

There are four types of seam positions to choose from in QIDI Studio: Nearest, Aligned, Rear and Random. They can continue to optimize the seam representation.

For the working principles and expressions of the algorithms related to these four seam modes, please refer to QIDI Wiki:

https://wiki.qidi3d.com/en/software/qidi-slicer/print-settings/seam-position
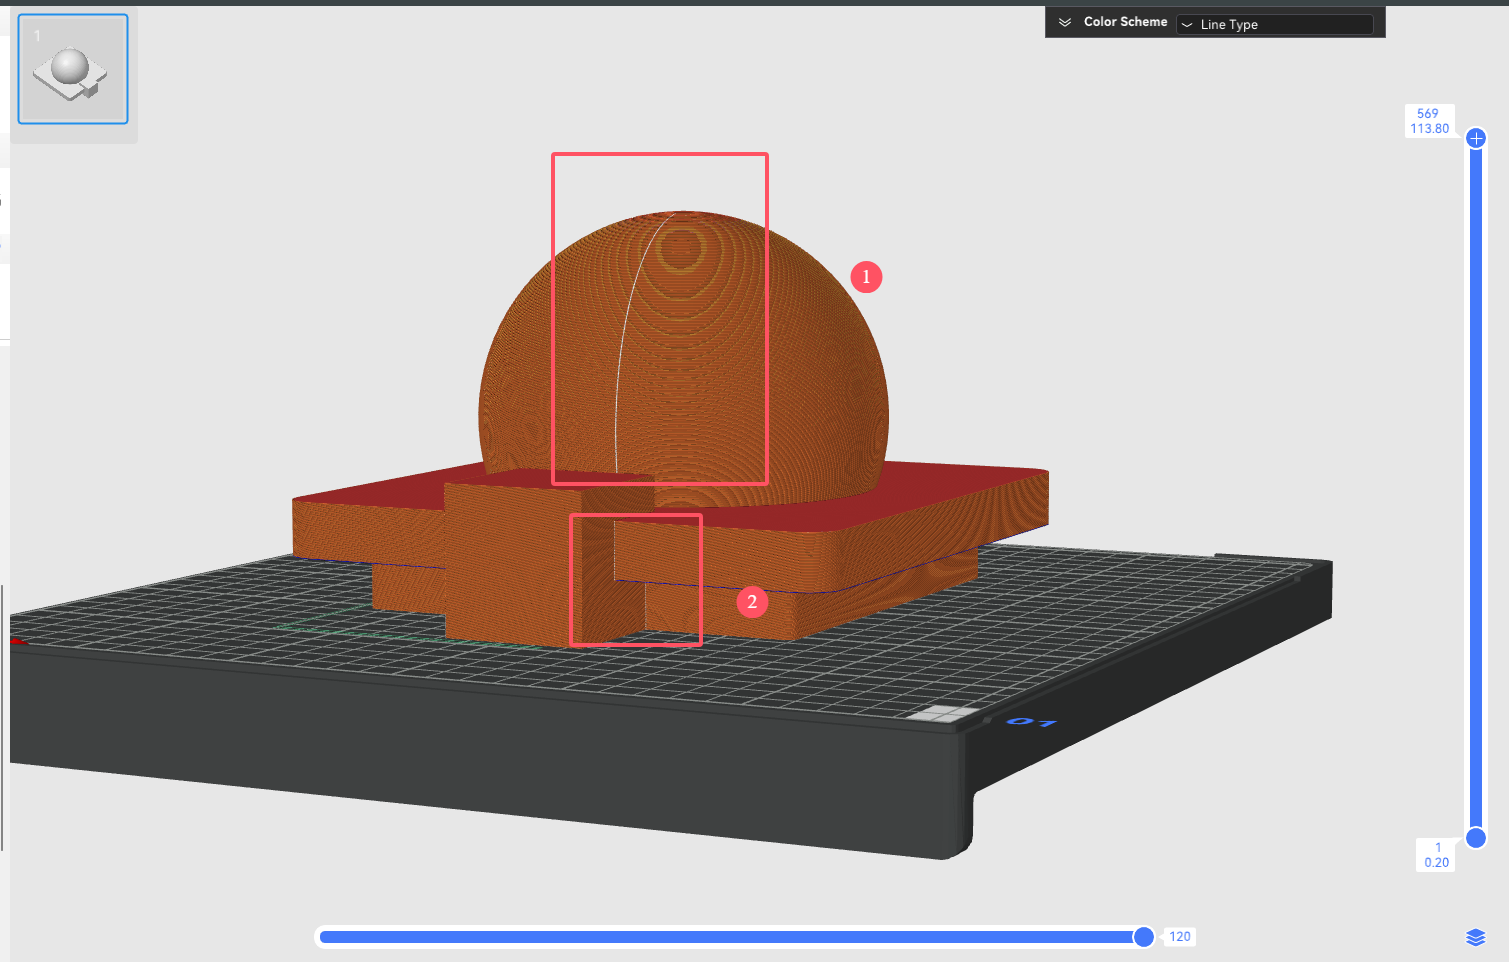
Example of Optimizing Seam Position:

Steps to optimize model seams in QIDI Studio

Problem Analysis: As shown in the figure above, after using the “Align” seam mode, the seams of this model are mainly distributed in parts 1 and 2.

Part 1: The seam is located on the front of the model, which affects the performance and needs to be optimized to the back of it.

Part 2: The seams are already hidden on the concave vertices and perform well, sp no optimization is needed.

Steps to optimize model seams in QIDI Studio

Optimization steps: Use the seam painting tool to paint the seam on the back of the ball, and then slice it. We can find that the seams on the front of the model disappeared.

Steps to optimize model seams in QIDI Studio

In the end

Through the above tutorials and introductions, you can effectively optimize the model seams and appearance in QIDI Studio. Seam optimization can also enhance the stability of the overall structure, providing strong support for you to create higher quality 3D printed works.

Read More

How to Add Modifiers in QIDI Studio?

How to Add Negative Parts in QIDI Studio?

How to Create Custom Filaments or New Processes in QIDI Studio?

Table of contents

FAQ

당사의 3D 프린팅 장비와 서비스에 대한 가장 궁금한 질문에 대한 답변을 찾아보세요.

3D 프린팅은 디지털 파일을 기반으로 3차원 물체를 제작하는 과정입니다. 플라스틱이나 금속과 같은 재료를 겹겹이 쌓아 최종 제품을 제작합니다. 이 혁신적인 기술은 맞춤형 제작과 신속한 프로토타입 제작을 가능하게 합니다.

저희는 모든 제품에 대해 빠르고 안정적인 배송 옵션을 제공합니다. 주문이 접수되면 배송 진행 상황을 확인할 수 있는 추적 번호를 보내드립니다. 배송 시간은 지역에 따라 달라질 수 있습니다.

저희 3D 프린터는 제조 결함에 대한 1년 보증을 제공합니다. 연장 보증 옵션을 구매하실 수 있습니다. 자세한 내용은 보증 정책을 참조하세요.

네, 저희는 번거로움 없는 반품 정책을 시행하고 있습니다. 구매하신 상품에 만족하지 않으시면 30일 이내에 반품하시면 전액 환불해 드립니다. 상품이 원래 상태인지 꼭 확인해 주세요.

물론입니다! 저희 전담 지원팀이 모든 질문과 문제를 도와드립니다. 이메일이나 전화로 연락하시면 신속한 지원을 받으실 수 있습니다. 또한, 다양한 정보를 제공하는 온라인 리소스 센터도 운영하고 있습니다.

여전히 질문이 있습니까?

문의사항이 있으시면 언제든지 연락주세요.