Your Guide to Fixing Under-Extrusion on a 3D Printer

Share this post
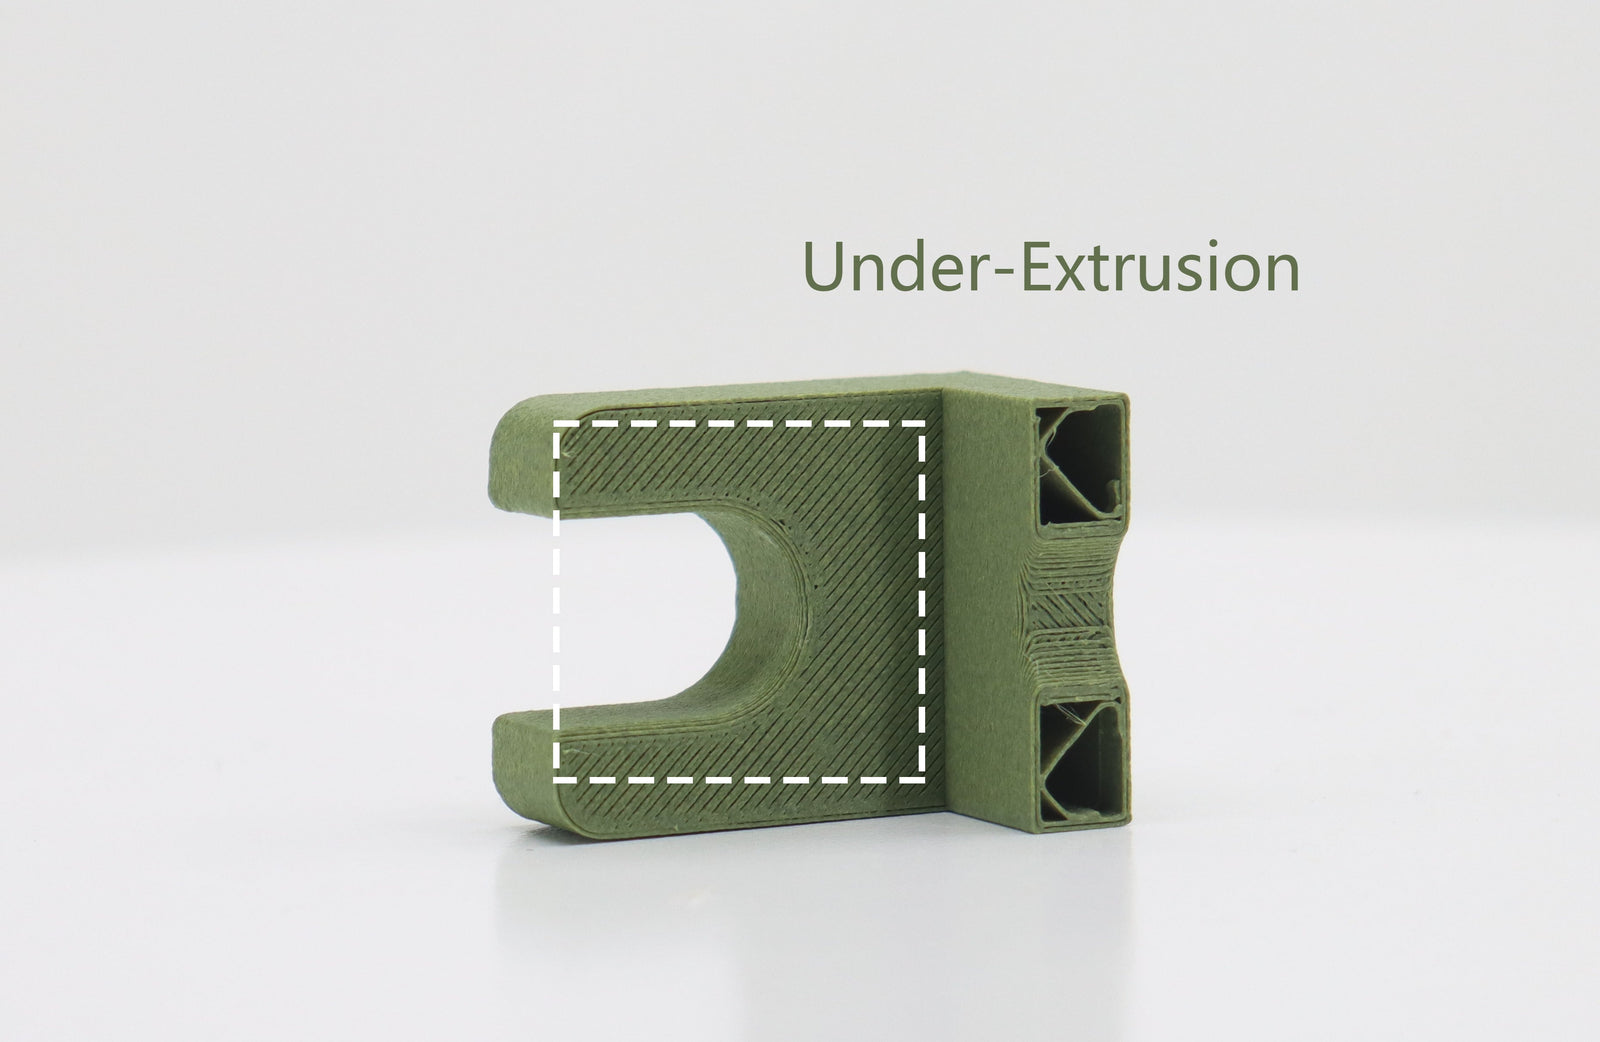
Close-up of a green 3D‑printed part labeled “Under‑Extrusion,” showing sparse walls and gaps highlighted by a dashed box.

You’ve waited hours for your print to finish, only to pull it off the build plate and find disappointment. It’s one of the most common and frustrating problems in 3D printing: the model is weak, full of gaps, and has a rough, stringy texture. This issue has a name: under-extrusion.

Thankfully, it's almost always fixable. Under-extrusion has several possible causes, but you can diagnose and solve it with a logical, step-by-step approach. This guide will walk you through that process, from simple software checks to essential hardware maintenance, to get your 3D printer running perfectly again.

Hands loading green and purple filament spools into the top bay of a desktop 3D printer with a touchscreen panel in front.

What is Under-Extrusion in 3D Printing And How to Spot It

In simple terms, under-extrusion happens when your 3D printer is unable to push out the amount of filament that the job requires. The printer is moving along the correct path, but it isn't laying down enough material, leading to a starved-looking print. This compromises a model’s appearance and, more importantly, its structural strength.

Here are the classic signs of an under-extruding 3D printer:

  • Gaps between layers.
  • Entire layers are completely missing.
  • Very thin, wispy, or incomplete infill structures.
  • A rough, pitted, or hole-covered surface texture.
  • Prints that feel noticeably brittle and weak.

Start Here: Are Your Slicer Settings Causing Under-Extrusion?

Before you pick up a single tool, always check your slicer settings. This is the best place to start because the fixes are fast, easy, and very often solve the entire problem. An incorrect setting in your slicing software is a frequent cause of 3D printing issues.

Slicer Setting The Common Problem What to Do (The Fix)
Flow Rate / Extrusion Multiplier The setting is too low, causing the printer to intentionally push out less plastic than needed. Ensure it is set to 100% as a baseline. For precision, calibrate it by printing a hollow cube and measuring its wall thickness with calipers.
Printing Temperature The hotend is too cool, making the filament too thick and viscous to flow freely through the nozzle. Check the recommended temperature range on your filament spool. Try increasing the temperature in 5-degree increments to see if the flow improves.
Print Speed The printer is moving too fast for the hotend to properly melt the filament in time. Try either reducing your overall print speed, or increasing your printing temperature to compensate for the high speed.
Filament Diameter The slicer is set to the wrong diameter (e.g., 2.85mm) while you are using 1.75mm filament. Double-check that this setting in your slicer's machine profile perfectly matches the diameter specified on your filament spool (usually 1.75mm).

Is Your 3D Printer's Hardware the Problem?

If you've confirmed your slicer settings are correct and the problem persists, the next step is to inspect the physical hardware of your 3D printer. These mechanical issues are very common causes of poor extrusion.

Side view of a 3D printer toolhead assembly with a transparent cover, showing the heatsink, fan, and nozzle aligned above the build plate.

Check for a Clogged Nozzle

  • What to Look For: A partial clog is more common than a full one. You may see 3D printer filament curling to one side as it exits the nozzle, or feel extra resistance when manually pushing filament through.
  • Solution: Perform a "cold pull." Heat the nozzle, manually push some filament through, let it cool down about halfway, and then pull it firmly back out. This will often drag any debris out with it.

Inspect the Extruder Assembly

  • What to Look For: The hobbed gear (the one with teeth) can get clogged with plastic dust, causing it to slip. The tension arm may also be too loose or too tight.
  • Solution: Use a small brass brush to clean any debris out of the gear's teeth. Adjust the tension screw so the gear has a firm, but not crushing, grip on the filament.

Examine the Filament Path

  • What to Look For: Tangles on the spool, or a Bowden tube (if you have one) that is sharply bent, kinked, or has visible wear inside.
  • Solution: Ensure the spool can rotate freely. If you have a Bowden system, check for and remove any tight bends. Consider replacing the PTFE tube if it looks worn.

Could Your Filament Be the Hidden Culprit in Your 3D Printing Problem?

If your software and hardware check out, the filament itself may be the root of the problem. Low-quality or poorly stored filament can be the hidden cause of many 3D printing headaches.

Problem: Diameter Inconsistency

  • Symptom: Extrusion looks uneven, with some parts looking better than others.
  • Solution: Use digital calipers to measure the filament at several points along its length. If the diameter varies more than the manufacturer's stated tolerance (e.g., ±0.03mm), the filament is low quality and should be replaced.

Problem: Wet Filament

  • Symptom: You hear a distinct crackling or popping sound from the nozzle during printing. The print surface looks rough and has poor layer adhesion.
  • Solution: Use a dedicated filament dryer to bake the moisture out of the spool according to the manufacturer's instructions. Storing filament in an airtight container with desiccant can prevent this issue.

Print with Confidence: A Final Summary on Under-Extrusion

Solving under-extrusion can feel like a daunting task, but a systematic approach makes it manageable. By checking the easiest things first (slicer settings), then moving on to the physical components (hardware and filament), you can efficiently diagnose and fix the root cause of your 3D printing woes.

Think of your consumer 3D printer like any other precision tool; it requires occasional maintenance and calibration to perform at its best. Learning to troubleshoot issues like under-extrusion is a core part of the 3D printing journey. Once you master it, you'll be rewarded with consistent, strong, and beautiful prints every time.

FAQs About Under-Extrusion

Q1. Why does fast or hard retraction result in under-extrusion?

Too fast or too hard retraction pulls the melted plastic back into the colder section of the hotend. When it starts printing again, there is a lag until the plastic comes back to the nozzle tip. This forms small gaps and blobs, and both result in under-extrusion when the printer is doing a traveling move.

Q2. Could putting the incorrect nozzle size into my slicer be the cause?

Yes. Say you insert a 0.6mm nozzle, but your slicer assumes it is 0.4mm, the software is going to work out the flow for the reduced size. Your printer is then going to extrude significantly less than the larger nozzle is capable of, leading to extremely frail prints and not much material being deposited.

Q3. What is "Heat Creep" and how does it lead to under-extrusion?

Heat creep occurs whenever your hotend is not cool enough, and the heat is transferred up from the nozzle. The filament becomes too pliable at the wrong moment, expands, and becomes lodged in the heat break. The added friction continues to accumulate until there is a clog, causing more and more under-extrusion until the filament stops altogether.

Q4. Why does my print begin nicely but then lose material halfway through?

Normally, that indicates a problem that worsens with time. Look for a tangle on the filament spool that is becoming tighter. It may also be heat creep occurring after an hour of print time, or the extruder gear gradually filling up with plastic dust and losing its grip on the filament.

Q5. Why does the PTFE tube lead to under-extrusion in Bowden printers?

The filament travels back and forth in the PTFE tube, creating a groove in the tube, particularly around the fittings, over time. This causes friction that prevents the filament from gliding smoothly. Your extruder motor is too weak to easily push the filament, leading to consistent under-extrusion.

Table of contents

FAQ

当社の 3D プリンターとサービスに関する最も緊急な質問への回答を見つけてください。

3Dプリンティングとは、デジタルファイルから立体的な物体を作成するプロセスです。プラスチックや金属などの材料を重ね合わせて最終製品を作り上げます。この革新的な技術により、カスタマイズと迅速な試作が可能になります。

すべての商品に、迅速かつ信頼性の高い配送オプションをご用意しております。ご注文が完了すると、追跡番号をお送りし、配送状況をご確認いただけます。配送時間は、お住まいの地域によって異なる場合があります。

当社の3Dプリンターには、製造上の欠陥に対する1年間の保証が付いています。延長保証オプションもご購入いただけます。詳細は保証ポリシーをご覧ください。

はい、返品ポリシーをご用意しております。ご購入いただいた商品にご満足いただけない場合は、30日以内にご返品いただければ全額返金いたします。商品が元の状態であることをご確認ください。

もちろんです!ご質問や問題がございましたら、専任のサポートチームがサポートいたします。メールまたはお電話でお問い合わせいただければ、迅速なサポートをご提供いたします。また、包括的なオンラインリソースセンターもご用意しております。

まだ質問がありますか?

ご質問がありましたらお気軽にお問い合わせください。