 س 2
س 2


Infill في الطباعة ثلاثية الأبعاد: ما هو ولماذا يهم
يلعب الهيكل الداخلي للقطعة المطبوعة ثلاثية الأبعاد - والذي يُسمى الحشو - دورًا أساسيًا في نجاح الطباعة. يؤثر هذا النمط بين الأغلفة الخارجية على قوة القطعة ووزنها واستخدامها للمواد. تُحدث إعدادات الحشو الصحيحة فرقًا كبيرًا بين نموذج هش وجزء متين وعملي، مع مساعدتك على الموازنة بين وقت الطباعة واستهلاك المواد.
ما هو الحشو في الطباعة ثلاثية الأبعاد؟
الحشو هو الهيكل الداخلي الذي يملأ الفراغ داخل الغلاف الخارجي للعنصر المطبوع ثلاثي الأبعاد. تخيله كالهيكل الذي يدعم طباعتك من الداخل. عند تقطيع نموذج ثلاثي الأبعاد للطباعة، يُنشئ البرنامج هذا الهيكل الداخلي وفقًا لإعداداتك، مُولِّدًا أنماطًا توفر دعمًا هيكليًا دون أن يجعل العنصر صلبًا تمامًا.
تتكون الحشوة عادةً من أنماط هندسية متكررة تربط الجدران الداخلية للطباعة. تستخدم هذه الأنماط كميات متفاوتة من المواد حسب إعداد الكثافة الذي تختاره.

كيف يؤثر التعبئة على مطبوعاتك
يؤثر التعبئة بشكل مباشر على العديد من الجوانب الرئيسية للطباعة النهائية الخاصة بك:
- قوة: كثافة تعبئة أعلى يخلق المزيد من الاتصالات الداخلية، مما يؤدي إلى الحصول على مطبوعات أقوى يمكنها تحمل المزيد من الضغط والإجهاد.
- وزن:تحدد كمية الحشوة ثقل المنتج النهائي. كلما كانت الكثافة أقل، كانت الطباعة أخف.
- استخدام المواد:تتطلب زيادة كثافة الحشوة خيوطًا أكثر. يُعدّ تقليل كثافة الحشوة من أكثر الطرق فعالية لتوفير المواد وخفض تكاليف الطباعة.
- وقت الطباعة:تستغرق أنماط التعبئة الكثيفة وقتًا أطول للطباعة لأن الفوهة يجب أن تتحرك لمسافة أطول لترسيب كل هذه المواد الإضافية.
صلب مقابل مجوف مقابل حشو
يقدم استخدام الحشو مزايا كبيرة مقارنة بالمطبوعات الصلبة والمجوفة تمامًا:
| نوع الطباعة | المزايا | العيوب |
|---|---|---|
| صلب |
|
|
| أجوف |
|
|
| حشو |
|
|
إن إعداد التعبئة المختار جيدًا يمنحك أفضل ما في العالمين - القوة حيث تكون هناك حاجة إليها دون استخدام مفرط للمواد أو وقت طباعة.
أنواع هياكل الطباعة ثلاثية الأبعاد
أنماط التعبئة الشائعة
يؤثر النمط الذي تختاره للحشو بشكل كبير على أداء طباعتك. برنامج التقطيع يقدم العديد من خيارات الأنماط، كل منها له خصائص مميزة:
شبكة: هذا النمط البسيط ينشئ خطوطًا عمودية تشكل مربعات.نمط الشبكة سريع الطباعة ويوفر قوة متوازنة في اتجاهين (محوري X وY). إنه خيار ممتاز متعدد الاستخدامات للعديد من المطبوعات الأساسية.

مستقيمي الخطوط: يشبه الشبكة، لكن بخطوط متوازية تتبادل الاتجاهات بين الطبقات. يوفر هذا النمط متانة جيدة بأقل كمية من المواد، ويطبع بسرعة. إنه مثالي للمسودات والنماذج الأولية حيث تكون سرعة الطباعة أهم من أقصى قوة.

مثلث: يُشكّل مثلثات في جميع أنحاء الجزء الداخلي من طباعتك. يُوزّع هذا النمط القوة بشكل أكثر توازناً من أنماط الشبكة، ويقاوم الانحناء من اتجاهات متعددة، مما يجعله مناسباً للأجزاء الوظيفية التي تحتاج إلى قوة ثابتة.

قرص العسل: يُنشئ خلايا سداسية الشكل تُشبه خلية النحل. يُوفر هذا النمط نسبة قوة إلى وزن استثنائية ومقاومة ممتازة للضغط. على الرغم من أنه يستخدم مواد أكثر ويستغرق وقتًا أطول في الطباعة مقارنةً بالأنماط الأبسط، إلا أن حشوة قرص العسل مثالية للأجزاء التي تحتاج إلى تحمل وزن.

الجيرويد: بنية عضوية مموجة متصلة. يوفر نمط الدوران قوة موحدة في جميع الاتجاهات (متساوي الخواص)، ويسمح بتدفق الهواء والسوائل عبر الطباعة. وهو مفيد بشكل خاص للمواد المرنة والتطبيقات التي تتطلب خصائص ميكانيكية فريدة.
خصائص أداء النمط
توزيع القوة
توزع الأنماط المختلفة القوة بطرق مختلفة:
- الشبكة والمستطيلة:أقوى على طول المحورين X وY، وأضعف على طول المحور Z.
- مثلث:قوة أكثر توازناً في جميع الاتجاهات الأفقية.
- قرص العسل:قوة ضغط ممتازة مع توزيع جيد للحمل.
- الجيرويد:القوة الأكثر انتظامًا في جميع الاتجاهات، بما في ذلك المحور Z.
المرونة والاعتبارات المادية
يؤثر نمط التعبئة على كيفية انثناء الطباعة تحت الضغط:
- الجيرويد:يوفر أقصى قدر من المرونة المتسقة ويعمل بشكل استثنائي مع مادة TPU والخيوط المرنة الأخرى.
- قرص العسل:يوفر مرونة متحكم بها تحت الضغط مع استرداد جيد.
- شبكة/مستطيلة:يخلق هياكل أكثر صلابة مع إعطاء أقل.
- مثلث:يوفر الصلابة مع مقاومة متوازنة للانحناء.
سرعة الطباعة والكفاءة
يؤثر اختيارك للنمط بشكل كبير على وقت الطباعة:
- مستقيم الخطوط:عادةً ما يكون الأسرع في الطباعة.
- شبكة:سريعة وفعالة.
- مثلث:وقت طباعة معتدل.
- قرص العسل:أبطأ بسبب تغييرات الاتجاه المتكررة.
- الجيرويد:غالبًا ما يكون النمط الأبطأ بسبب هندسته المعقدة.
بالنسبة للمشاريع التي تتطلب وقتًا، تُقلل الأنماط البسيطة، مثل الأنماط المستقيمة أو الشبكية، من مدة الطباعة. عندما تكون القوة هي الأولوية، فإن الوقت الإضافي اللازم لأنماط قرص العسل أو الحلزونية يكون عادةً مُجديًا.

كثافة التعبئة في الطباعة ثلاثية الأبعاد
ماذا تعني نسبة التعبئة؟
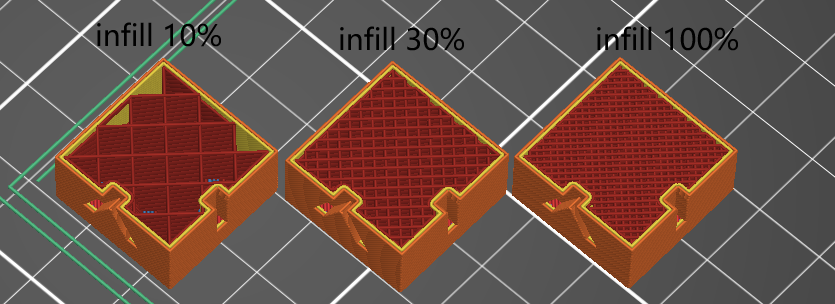
كثافة الحشو هي نسبة المساحة الداخلية المملوءة بالمادة في طباعتك ثلاثية الأبعاد. تتراوح من ٠٪ (مجوفة تمامًا) إلى ١٠٠٪ (مصمتة تمامًا).
كثافة منخفضة (10-20%)
يُنتج الحشو منخفض الكثافة مطبوعات خفيفة الوزن وسريعة الإنتاج. هيكله الداخلي خفيف الوزن، ولكنه يوفر دعمًا كافيًا للطبقات العليا من طباعتك. يُعدّ نطاق الكثافة هذا مثاليًا للنماذج الزخرفية والنماذج الأولية وغيرها من المنتجات غير العملية التي لا تُعدّ المتانة أمرًا بالغ الأهمية.إن الاستخدام البسيط للمواد يجعل المطبوعات منخفضة الكثافة اقتصادية، خاصة للأشياء الأكبر حجمًا.
كثافة متوسطة (25-40%)
يحقق الحشو متوسط الكثافة توازنًا بين المتانة وكفاءة المواد. يوفر هذا النطاق متانة معقولة للأغراض العامة مع الحفاظ على وقت الطباعة و... تكاليف المواد متوسط. عادةً ما تحقق الأغراض المنزلية والحاويات والأجزاء الوظيفية خفيفة الوزن أداءً جيدًا مع حشو متوسط الكثافة. وتندرج معظم مشاريع الطباعة ثلاثية الأبعاد اليومية ضمن هذه الفئة، حيث تقدم نتائج جيدة دون استخدام مفرط للمواد.
كثافة عالية (50-100%)
يُنتج الحشو عالي الكثافة قطعًا قوية ومتينة قادرة على تحمل ضغط كبير. مع اقترابك من نسبة 100%، تصبح المطبوعات شبه صلبة وتعزز متانتها إلى أقصى حد. هذا النطاق ضروري للمكونات الميكانيكية والأدوات والقطع التي تحتاج إلى تحمل وزن أو مقاومة للكسر تحت الضغط. لكن الفارق يكمن في زيادة كبيرة في استهلاك المواد وإطالة أوقات الطباعة. احتفظ بإعدادات الكثافة العالية للقطع التي تُعد المتانة فيها أمرًا بالغ الأهمية لأداء وظائفها.
كيف تؤثر الكثافة على مطبوعاتك
يحدد استهلاك المواد
زيادة نسبة الحشو تعني استخدام خيوط أكثر. قد تستهلك نسبة حشو ٢٠٪ ثلث المواد اللازمة لطباعة مطبوعة كاملة، مما يوفر المواد والمال. أما بالنسبة للمطبوعات الكبيرة، فحتى التخفيضات الطفيفة في نسبة الحشو قد تُحقق وفورات كبيرة.
يتحكم في مدة الطباعة
تؤثر كثافة التعبئة بشكل مباشر على مدة اكتمال الطباعة. تكتمل المطبوعات منخفضة الكثافة (10-20%) أسرع بكثير من المطبوعات عالية الكثافة (50% فأكثر). يحدث هذا لأن الطابعة تحتاج إلى تتبع المزيد من المسارات وإيداع المزيد من المواد بإعدادات تعبئة أعلى.
إنه يحدد القوة الهيكلية
تزداد قوة طباعتك بزيادة كثافة الحشو. الأجزاء التي تحتوي على حشو بنسبة 50% أو أكثر تتحمل ضغطًا ووزنًا كبيرين. مع ذلك، لا تزداد القوة بشكل خطي، فالفرق بين حشو بنسبة 80% و100% غالبًا ما يكون ضئيلًا، مع استخدام مواد أكثر بكثير.
العوامل التي تؤثر على اختيارك للحشو
في حين أن الأقسام السابقة تناولت أنماط التعبئة والكثافات المتاحة، فإن هذا القسم يركز على كيفية إجراء الاختيار الصحيح لموقفك المحدد.
غرض الطباعة ثلاثية الأبعاد الخاصة بك
دع وظيفة الطباعة الخاصة بك توجه قرارات التعبئة الخاصة بك:
للتطبيقات المتخصصة
بالإضافة إلى اعتبارات القوة الأساسية، فكّر في المتطلبات الفريدة. تستفيد الأجزاء التي تحتاج إلى امتصاص الاهتزازات من حشوة الجيروسكوب بكثافات متوسطة. تتطلب الأجسام المصممة للطفو نسب حشو منخفضة جدًا. أما الأجسام التي ستتعرض لدرجات حرارة عالية، فتؤدي أداءً أفضل مع حشوة عالية الكثافة لتحسين توزيع الحرارة.
العوامل البيئية
انتبه لمكان وكيفية استخدام طباعتك. تتطلب القطع الخارجية مقاومة للماء، مما يعني غالبًا كثافة حشو أعلى لمنع تسرب الماء. قد تتدهور الأجزاء المعرضة للأشعة فوق البنفسجية بمرور الوقت، مما قد يتطلب قوة إضافية منذ البداية.
اعتبارات خاصة بالمواد
تتطلب الخيوط المختلفة طرق تعبئة مختلفة:
يُطبع PLA بسلاسة مع معظم الأنماط، ولكنه قد يكون هشًا مع كثافات الحشو المنخفضة. انكماشه البسيط يجعله مناسبًا للأنماط الهندسية الدقيقة.
يُظهر ABS وPETG حركة حرارية أكبر أثناء التبريد. تستفيد هذه المواد من أنماط حشو تُمكّن من التمدد والانكماش، مع كون الجيروسكوب فعالاً بشكل خاص في منع تراكم الإجهاد الداخلي.
غالبًا ما يكون أداء الخيوط المرنة (TPU/TPE) ضعيفًا مع أنماط الحشو المعقدة التي تُعيق حركتها الطبيعية. أما الأنماط الأبسط ذات التباعد المعتدل فتسمح للمادة بالحفاظ على خصائص مرونتها.
قد تُسبب الخيوط المركبة التي تحتوي على جزيئات من الخشب أو المعدن أو ألياف الكربون تآكلًا مُتسارعًا للفوهة. بالنسبة لهذه المواد، يُطيل استخدام أنماط فعّالة بكثافات معتدلة عمر الفوهة.
قدرات الطابعة والقيود
يؤثر جهازك بشكل مباشر على إعدادات التعبئة العملية:
ديناميكيات رأس الطباعة
قد تواجه إعدادات طارد بودن صعوبة أكبر مع التغييرات السريعة في الاتجاه التي تتطلبها أنماط التعبئة المعقدة. عادةً ما تتعامل أنظمة الدفع المباشر مع أنماط التعبئة المعقدة بدقة أكبر.
اعتبارات حجم الفوهة
الفوهات الأكبر (0.6 مم فأكثر) تطبع أسرع، لكنها تُنتج هياكل حشو أكثر خشونة. عند استخدام فوهات أكبر، ستحتاج إلى مسافات أوسع في نمط الحشو لتجنب الإفراط في البثق عند نقاط التقاطع.
فعالية نظام التبريد
قد تواجه الطابعات المزوّدة بمراوح تبريد أحادية الجانب صعوبة في استخدام كثافات تعبئة أعلى، خاصةً في الأماكن المغلقة حيث تتراكم الحرارة. في هذه الحالات، يُمكن تحسين النتائج بتقليل كثافة التعبئة أو زيادة الحد الأدنى لوقت الطبقة.
قيود قوة المعالجة
تفتقر لوحات تحكم الطابعات القديمة أحيانًا إلى قوة المعالجة اللازمة للتعامل مع الأنماط المعقدة بسرعات عالية. إذا كانت طابعتك تتعطل أثناء طباعة أجزاء التعبئة المعقدة، فقد يلزم استخدام أنماط أبسط بغض النظر عن خصائصها الهيكلية.
إعدادات التعبئة الرئيسية للحصول على مطبوعات ثلاثية الأبعاد أفضل!
اختيار إعدادات الحشو المناسبة هو مفتاح نجاح الطباعة ثلاثية الأبعاد. باستخدام الأنماط والكثافات المناسبة، يمكنك إنشاء مطبوعات متوازنة بين القوة والوزن واستخدام المواد ووقت الطباعة. تذكر أن كل مشروع يحتاج إلى أساليب مختلفة - فالنماذج الزخرفية تعمل بشكل جيد مع حشو بنسبة 10-20% باستخدام أنماط بسيطة، بينما قد تحتاج الأجزاء الوظيفية إلى حشو بنسبة 50% باستخدام هياكل أقوى. جرّب تركيبات مختلفة وعدّلها بناءً على طابعتك الخاصة. موادستعمل هذه التغييرات الصغيرة في البنية الداخلية للطباعة على تحسين نتائجك بشكل كبير.

